Figure 13-1. Screen shot of choosing guideline sets in Bobby 5.0.
A large number of sophisticated software tools can be used to check for web accessibility. U.S. federal agencies and corporations are spending millions of dollars on tools that claim to test websites for accessibility. But what actually can and cannot be tested with these tools?
Any accessibility testing must be viewed as a process that combines automated software tools with human judgment. There is no tool that you can run against your website (or web page, for that matter) in order to assert that it is accessible and/or complies with the Section 508 provisions or the Web Content Accessibility Guidelines (WCAG)—no matter how much you are willing to pay. When a website claims Section 508 conformance or WCAG conformance verified by some tool or other (and many do), the most it can mean is that the site (or page) passed all of the automatic Section 508 or WCAG tests. Having said that, software-testing tools can help you find out if your site is not accessible or does not comply with WCAG or Section 508, by testing for the absence of valid required elements and/or attributes.
The first part of this chapter discusses the extent to which you can rely on software tools to check your web content for accessibility compared to how much you must rely on human evaluation. The next part of this chapter looks at six commercial accessibility testing tools and their performance on a set of test files.
We are going to look at each Section 508 provision in turn and
discuss the two aspects involved in testing for compliance with the provision.
I will call these two parts of the job the algorithmic part and the judgment part. Algorithmic testing generally verifies the presence of a
valid element or attribute, such as the alt attribute or the label element. Judgment comes in with questions, such as whether or not
the value of the alt attribute conveys the function of an active image or the information in an
inactive image.
This will be a fairly open-ended discussion. The algorithmic section addresses which parts of the accessibility testing could feasibly be automated. We will not be looking at particular tools, but what tools could do. The judgment section points out things that you, as an expert, can evaluate and then decide whether a given page passes or fails.
As noted at the beginning of the chapter, the next part of this
chapter will review specific accessibility checking tools. For reviewing those
tools, I devised a set of tests that cover accessibility issues, which are
described in the "Test Suite" section later in this chapter. When there
are specific tests in the test suite that relate to the Section 508 provision,
I list them in the section on algorithmic testing. For example, the section on
text equivalents refers to two tests (tests 1 and 4) relating to the presence
of alt attributes.
The following is the Section 508 provision for text equivalents:
§1194.22(a). A text equivalent for every non-text element shall be provided (for example, via "
alt", "longdesc", or in element content).
A computer program can verify the presence of alt attributes on elements where they are required, including img, area, and input with type="image" (tests 1 and 4). You can algorithmically check whether the alt attribute is actually present and whether it consists of a text
string (test 2). This includes the null string alt="", which is desirable on formatting images but never valid on an input element with type="image" or on any link where there is no text as part of the anchor (tests
22, 23, and 24). These restrictions can also be checked.
Common errors or violations, such as the use of filenames for
alt-text, can also be detected. Words like spacer
, go
, click
, and null
, and an alt attribute consisting of a space are also errors that software could
detect or highlight for examination.
Several of the tools covered in the "Accessibility Checking Software"
section of this chapter allow you to add suspicious words or phrases and other
characteristics of the alt-text that should raise errors or warnings (tests 2
and 5).
I think tools should distinguish between the kinds of alt-text
failure. Active images—like image links, image buttons, and image-map
areas—need alt-text (test 6). When the alt-text for these items is
missing, that is a very serious error. On the other hand, although small images
(formatting images that are less than 10 pixels in either dimension) need
alt-text, if they don't have it, that is just not a big deal. These images are
required to have an alt attribute to be valid XHTML, and they should have alt="", which tells a screen reader to ignore the image. But ignore the
image is exactly what the screen readers do if the alt-text is missing.
The only tool to make distinctions between the types of images is LIFT Machine. Unfortunately, it identifies 11 different types of images, including banner, bullet, composition, decorative, thumbnail, repetitive, and five more.
It is certainly possible for a software program to raise the
question of whether or not a longdesc attribute belongs on an image
for, say, images larger than a predetermined size. This doesn't seem very
helpful to me, but many software tools do raise this question for any
nontrivial image. Furthermore, the presence of certain file types should
trigger questions about the existence of text equivalents. These include (but
are certainly not limited to) the various media file types, such as .wav, .ra, .rm, and .ram files.
Judgment comes in when evaluating the quality of the text equivalents—whether a text string serves as a textual equivalent to the nontext element. More specifically, you need to ask:
alt-text convey the function of the image when the image is active? alt-text convey the information of the image in the case the image is not
active and when the image is conveying information? You should use alt="" for images that do not convey information, like formatting images.
There is some disagreement about the finer details. For example, I
would say that graphical "bullets" in front of items in a list should
have alt="", while others might argue for using alt="bullet". Of course, such lists should be coded as HTML unordered lists (<ul>), with CSS specifying a list-style-image referencing those
graphical bullets. However, the basic rules still apply, and either choice for
alt-text complies with §1194.22(a), regardless of which side of this particular
argument you take.
You may also need to visually inspect for the presence of text equivalents for audio and multimedia elements. In addition, in order to decide whether or not a transcript is appropriate, someone will need to actually read through the text to check that it actually matches the audio presentation.
If alt-text or object content is used for applets or objects (test
3), that text must be compared with the applet or object for equivalence. Consider an applet that acts as a ticker application for displaying
stock prices. alt-text or object content that says "Applet
displays current stock prices
", (as suggested by the U.S. Access Board
guide to the Section 508 Standards) is not actually an equivalent, since it does not enable the user
to obtain the current stock prices. Some more imaginative way of presenting the
equivalent data must be found, and deciding whether that equivalence is
achieved requires human judgment.
Judgment is also required in determining which images require long or in-line descriptions, like charts and graphs, as discussed in Chapter 6, and whether a long description is adequate in conveying the information of the image.
The following is the Section 508 provision for synchronized multimedia:
§1194.22(b) Equivalent alternatives for any multimedia presentation shall be synchronized with the presentation.
The existence of multimedia content can be detected by file
extension in an anchor or contents of an object element. For some multimedia formats (.smi, for example), it may be possible to determine algorithmically whether or not captioning is included. I think the most important
role for software testing relative to this provision of the Section 508
Standards is to highlight the places where multimedia appears, so that humans
can examine the accessibility accommodations of that content.
It is not possible to determine the existence of captions for all media formats. Therefore, human evaluation is required just to determine whether the synchronized equivalents are present. Then there is the question of the accuracy of the captions. Also the multimedia content must be studied to determine whether audio descriptions are necessary, and if they are necessary, are the audio descriptions adequate?
These questions must be answered to determine compliance with this provision of the Section 508 Standards on web accessibility.
The following is the Section 508 provision for color coding:
§1194.22(c). Web pages shall be designed so that all information conveyed with color is also available without color, for example from context or markup.
Automated software could be used to check for color specifications in the style sheet and corresponding elements in the web page, and deduce any color changes in the page that way. If there are no color changes through HTML or CSS on a web page, the page automatically complies with §1194.22(c) as far as text is concerned. However, images on the page could still be color-coded (images used as links, for instance). If the image color conveys important information, it raises accessibility issues.
Moreover, if there were color changes
in the page, it would be difficult to detect algorithmically whether
information was being conveyed by color alone. For
example, a simple search for "color words" in a page's source code
might turn up phrases from the page content, such as "the books in green
are available for checkout,
" which might suggest noncompliance, but still
requires a human evaluation.
A general evaluation of the page is necessary to determine if information is conveyed by color alone. Most sources that discuss testing for this provision recommend that human testing be done by viewing the page in black and white. I think that is wrong. It is much easier to check for the use of color-conveying information when color is available to the person addressing the question.
The following is the Section 508 provision for style sheets:
§1194.22(d) Documents shall be organized so they are readable without requiring an associated style sheet.
An algorithm can detect the presence of style sheets, style elements, and style attributes. If they don't exist, the page complies with §1194.22(d) vacuously. A testing tool could determine if style sheets are present and if there is no CSS positioning in those styles. In that case also, this provision is probably met. Beyond these boundary conditions, human judgment is needed to study how the document looks with style sheets disabled. In particular, it is necessary to evaluate background images to be sure that they do not convey any information, or if information is conveyed in background images, that it is also available by other means. All of this is important because screen readers generally operate on a page as if style sheets were disabled.
Pages should be viewed using a browser with style sheets turned off to determine whether the reading order of the page makes sense. It is also a judgment call whether there are structural elements, such as lists and headings, being presented just with stylistic changes instead of using HTML markup.
The following is the Section 508 provision for redundant text links with server-side maps:
§1194.22(e). Redundant text links shall be provided for each active region of a server-side image map.
If no server-side maps are present (img with the ismap attribute), the page obviously passes this provision (test 7). If a server-side map
is found (img with the ismap attribute and no valid usemap attribute), the question is whether or not redundant text links are
available. A program could be written to click on every pixel of the map, record the new
URL, and compare it with all href values on the page. That sort of overkill would be kind of silly though!
Software can at least detect the presence of server-side maps and flag them for subsequent human evaluation.
If a server-side map is found, it must be evaluated for the availability of text links for all the active regions of the map.
The following is the Section 508 provision for requiring client-side image maps:
§1194.22(f). Client-side image maps shall be provided instead of server-side image maps except where the regions cannot be defined with an available geometric shape.
If there is no server-side map on the page, it obviously complies with §1194.22(f) (test 7). If there is one, see §1194.22(e).
Since all regions can actually be defined with polygons, the page
should fail if a server-side map is used. All areas of the client-side map must
have a valid alt attribute (test 6).
The ismap attribute should never be used on an input element with type="image" (an "image button").
My interpretation of this provision is that the page does not comply with §1194.22(f) when a server-side map is found. The absence of a server-side map means that the page is compliant. Since this is an either/or requirement, no human judgment is required.
The following is the Section 508 provision for table headers:
§1194.22(g) Row and column headers shall be identified for data tables.
If a page has no tables at all, this provision is vacuously satisfied. I believe it is possible to devise sophisticated heuristic algorithms to separate data tables from layout tables with adequate certainty (test 32). Since almost all tables are layout tables, and since many websites still use layout tables, it would be especially advantageous if software could successfully separate out tables that are data tables. There are many issues involved in achieving this. The use of images in cells would suggest a layout table, whereas uniformity of cell content suggests a data table, and so on. Nested tables are almost certainly not data tables. Once an accessibility checker has determined that a table is probably a data table, the question of compliance comes down to whether or not row and column headers have been identified.
Having detected a data table, the tool could assert compliance if
all row and column heading cells (column 1 and row 1) are marked with th elements or if only the first column or the first row of cells is
marked with th.
The tool's capacity to identify data tables should extend to determining that accessible table markup (th, headers, summary, scope, caption) is being used when it should not be
used (test 33).
No matter how sophisticated the algorithm to detect data tables is, every page must be checked for their presence because the heuristics cannot be guaranteed to find data tables in every case. Once a table is determined to be a data table, the validity of its headings specification must be verified by examining the HTML source code for headings markup.
The following is the Section 508 provision for complex tables:
§1194.22(h) Markup shall be used to associate data cells and header cells for data tables that have two or more logical levels of row or column headers.
Although a tool could probably determine which tables on a site are data tables (albeit with some degree of uncertainty), I cannot imagine any way of algorithmically determining whether or not a given table is complex in the sense that it has two or more logical levels of row or column headers. However, if all data cells in the table have valid header attributes, the table conforms to this provision—whether or not it is complex.
Again, the situation is similar to that for the previous provision. Any page must be searched for data tables. When one is found, it requires human judgment to determine whether or not there are two or more logical levels of row or column headers. If there is at most one row heading and at most one column heading for each data cell, and these are in the same row and column as the cell, respectively, then the table is not complex. Judgment is required to determine whether or not the headers markup that is required by this provision is adequate. This can be verified by human testing with assistive technology or careful analysis of the HTML code.
The following is the Section 508 provision for frames:
§1194.22(i). Frames shall be titled with text that facilitates frame identification and navigation.
Software can check whether the frame elements in a frameset have valid title attributes (tests 8, 34, and 40). Exception can be taken in some
cases when title attributes are
inadequate, similar to considerations of suspicious alt-text (test 9).
Human judgment will determine whether or not the frame title attributes are useful for the purposes of identification and
navigation. For example, title="frame10078" and title="frame10077" are not useful ways of identifying a frame to convey its purpose.
The following is the Section 508 provision for flicker rate:
§1194.22(j). Pages shall be designed to avoid causing the screen to flicker with a frequency greater than 2 Hz and lower than 55 Hz.
Software can detect whether or not there are technologies present on a web page that might cause flickering in the hazardous range. Java, Flash, and JavaScript qualify as potential culprits. Furthermore, any animated GIF on the page could cause flickering. Animation and the frequency of frame transitions also could be detected algorithmically, but a frame rate in the hazardous range does not necessarily mean that the screen will be flickering at this rate; it is the change from light to dark that causes flickering. Taking the requirement beyond specific flicker rates, software can certainly flag moving text with the deprecated blink and marquee elements (tests 35 and 36).
You must inspect any page that has potential "flickering
technology
" on it to check whether or not flickering is occurring. If so,
you need to determine whether the frequency is in the range disallowed by this
provision and rectify matters if that is the case.
The following is the Section 508 provision for a text-only page:
§1194.22(k). A text-only page, with equivalent information or functionality, shall be provided to make a web site comply with the provisions of this part, when compliance cannot be accomplished in any other way. The content of the text-only page shall be updated whenever the primary page changes.
While it is possible to detect algorithmically some references to text-only pages, it is impossible to evaluate the equivalence of content or frequency of update of a text-only page. This provision mandates the use of a text-only page only in circumstances where compliance cannot be accomplished in any other way. The fact that a page cannot be made accessible in the first place obviously cannot be determined algorithmically.
There are two parts to evaluating a web page for compliance with this provision:
These are all difficult questions to answer, making this one of the most daunting of the Section 508 provisions for compliance testing.
The following is the Section 508 provision for scripting:
§1194.22(l) When pages utilize scripting languages to display content, or to create interface elements, the information provided by the script shall be identified with functional text that can be read by assistive technology.
If a page uses scripts to modify attributes for visual effect, this is fine from an accessibility standpoint, since it does not affect the user's ability to interact with the site. In some cases, this could be determined with a software accessibility checker since (in principle) an algorithm could be devised to check if the fly-over submenu links are available on the page opened by the main menu item link. However, this is a pretty complex task. It is, in effect, one program trying to evaluate another.
The criterion here should be simply whether someone using assistive technology can handle the page and its interactions. This requires testing using the screen readers or a talking browser like Home Page Reader. Without access to assistive technology, you can evaluate items such as fly-over menus by testing whether redundant text links are readily available for all submenu links; that is, is the enhancement provided by the script simply visual?
The following is the Section 508 provision for applets and plug-ins:
§1194.22(m) When a web page requires that an applet, plug-ins, or other application be present on the client system to interpret page content, the page must provide a link to a plug-in or applet that complies with §1194.22(a) through (l).
It is possible for software accessibility checkers to detect whether or not applets, plug-ins, or other applications are required or opened on a page. They might be able to determine if corresponding links are present on the page at least for a few common examples, like Adobe Reader for PDF files.
Human involvement and significant further testing may be required in determining whether or not a link is present to open or obtain the plug-in, applet, or application and whether or not that plug-in, applet, or application meets the Section 508 provisions for software in §1194.21 (a)–(l).
The following is the Section 508 provision for online forms:
§1194.22(n). When electronic forms are designed to be completed online, the form shall allow people using assistive technology to access the information, field elements, and functionality required for completion and submission of the form, including all directions and cues.
A testing tool can check that every input element of type text, password, checkbox, radio, and file has an id attribute matching the for attribute of a label element enclosing text, which is the prompt for that input element (tests 10 and 12–16). If there is no such label, the tool can check if there is a valid title attribute on the form control (test 11). The same checking applies
to textarea elements and select menus (tests 17 and 18).
There can be algorithmic checks on the quality of both the title and the label. For example, a tool could verify that neither is empty (test 20).
In addition, input elements of type image must have a valid alt attribute, but that is an alt-text problem, not a form problem.
Human judgment comes in verifying that the prompts (labels) and titles are appropriate. Keyboard access should be checked as well.
The following is the Section 508 provision for skip navigation:
§1194.22(o). A method shall be provided that permits users to skip repetitive navigation links.
If there were a reliable algorithm to determine the position of the main content, and what to skip over, then screen reader developers would include that in their products, and so no skip navigation link would be needed! In fact, screen readers include jumps like this, but they are still heuristic and quite likely to miss the mark. For each large block of links (greater than, say, five), software could check if there is a link to a local anchor that skips over those links (test 29). In a similar way, a tool could check for the presence of headings markup that could serve instead of skip links (test 30). If either of these tests turn out positive, the page complies with §1194.22(o). The page probably also complies if there is no large block of links. The page also complies with this provision if it uses frames that comply with 1194.22(i) and that separate main content from navigation.
Examine the page to determine whether
there are large blocks of "repetitive navigation links
" and use
assistive technology to verify that a skip navigation link works in helping
users bypass those links.
The following is the Section 508 provision for timed responses:
§1194.22(p). When a timed response is required, the user shall be alerted and given sufficient time to indicate more time is required.
If there are no meta refresh tags, no forms, and no scripting, then there are no timed responses. There may be
heuristics to help decide if a timed response is required, but it is difficult
to imagine an algorithm that could further decide whether or not sufficient
time has been allowed.
Check all form submissions to determine
if timed responses are required and if it is possible to request more time if
they are. If the meta refresh tag is used, check whether the time allowed is sufficient or if the
user is given the option of requesting more time.
The Web Accessibility Initiative (WAI) Evaluation and Repair Tools
working group lists more than 90 software tools in three categories: Evaluation
, Repair
, and Transformation
. Here, we will
look at only the following six commercial web accessibility testing tools (these brief descriptions
are drawn from their corresponding websites):
To review these tools, I went through a simple process of evaluating about 70 files, looking for specific errors in about half the cases and for the absence of specific errors in roughly the other half. This is not a complicated spidering problem. Once errors were found, I was not interested in repair (remediation), which is provided by both InFocus and Ramp Ascend. LIFT Machine, WebKing, and WebXM offer tests for usability—we aren't looking at those tests. For the latter two, accessibility checking is only a recent addition to features involving site maintenance, integrity, and security
After the first pass on the tests, I submitted the results to each of the product owners, to verify that I had interpreted the tools' results correctly and to make a case for improvements in the testing algorithms. Both Deque (Ramp Ascend) and Parasoft (WebKing) made changes in their tool's algorithms, and with those revised tools, I reran the tests. Both tools improved their scores, and Deque provided access to the beta version of Ramp Ascend version 6.0, which I tested late in the process. With that version, Ramp Ascend achieved the highest score.
When I first ran these tests, I included two additional tools that are not covered here. One was aDesigner, a beta version of a tool from IBM Tokyo Research Center, available from IBM AlphaWorks. I hadn't remembered that the public version of the tool did not have any spidering, so it was not acceptable for the task. The other tool I dropped from the process was PageScreamer because the company (Crunchy Technologies) seems to be out of business. aDesigner had one of the best scores on the first round; PageScreamer had the worst.
The following descriptions of these testing tools go through the four simple steps of setting up the tests to be performed, analyzing the files, examining the results, and obtaining the reports. Generally, I tried to use WCAG AA conformance together with the Section 508 Standards. Brief descriptions of the test files and a summary of the results from all the tools are presented in the "The Test File Set and Results" section later in this chapter.
Bobby, from Watchfire, is the best known accessibility checker because it has been around for the longest time. Bobby was first released by the Center for Applied Special Technology (CAST) as a free downloadable tool in September 1996. Bobby was acquired by Watchfire in 2002. In 2003, Watchfire produced Version 5.0, with improved spidering and reporting. My understanding is that the testing algorithms for the previous version, Bobby Worldwide (Version 4.0), are the same.
To choose tests in Bobby 5.0, you need to create a
project and associate the choice of tests with that project. So once Bobby is
started, open the project Properties dialog box (Tools > Project Properties
).
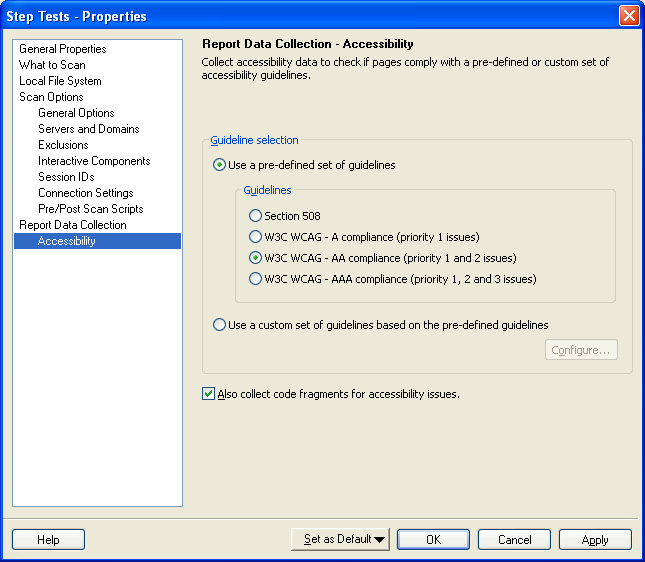
Choose a name for the project, say STEP Tests, and select Accessibility from the list on the left side of the
project Properties dialog box, as shown in Figure
13-1.
Figure 13-1. Screen shot of choosing guideline sets in Bobby 5.0.
The Guidelines section of this Properties dialog box allows the choice of Section 508 Standards or WCAG with A, AA, or AAA compliance (most of the tools offer these choices). Notice that you cannot select Section 508 and WCAG Priority 1 and 2 (this is also the case with WebXM). So, you will create a custom set of guidelines that combines the two.
Notice the check box to select to collect code. If you want the code fragments included in the reports, check this box.
To create custom guidelines, select that radio button and click the Configure
button. You will see the Configure Custom Guidelines
dialog box, as shown in Figure 13-2.
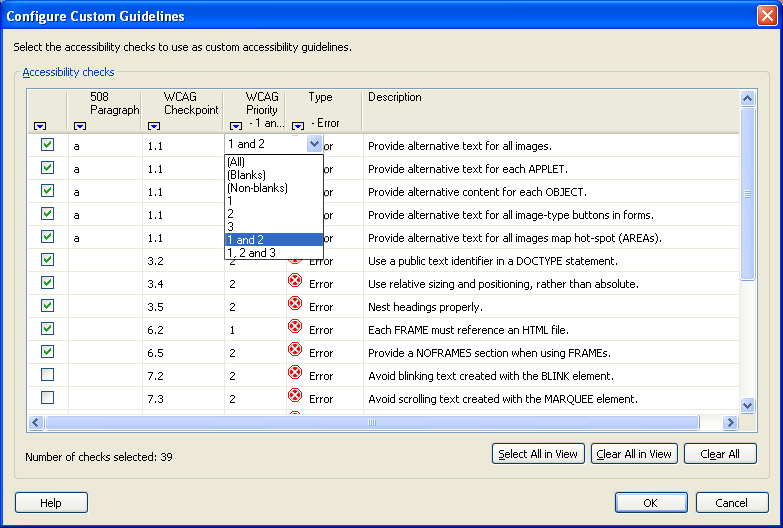
Figure 13-2. Selecting custom tests in Bobby.
This Bobby interface includes all the relevant information for each
test. The Type
column indicates whether or not
the test raises an error or a warning. For each test, the corresponding WCAG
checkpoint and priority is listed. If relevant, the paragraph of the Section
508 Standards appears there, too.
Using this interface, if you want all WCAG Priority 1 and 2
sure-fire tests (no warnings), restrict the Type
column to Errors
and the WCAG
Priority
column to 1 and 2, using the
pull-down menus shown in Figure 13-2. Then select the Select
All in View
button, and each of the check boxes will be checked. Well, that should work,
but it doesn't. What happens as a result of the sequence just described is that
all Priority 1 and Priority 2 tests are checked, including the warnings. You
need to sort through the tests and uncheck the warnings you don't want.
The project Properties
dialog box is
also where you set up Bobby to analyze the site. Select What
to Scan
from the list on the left to see the dialog box shown in Figure 13-3.
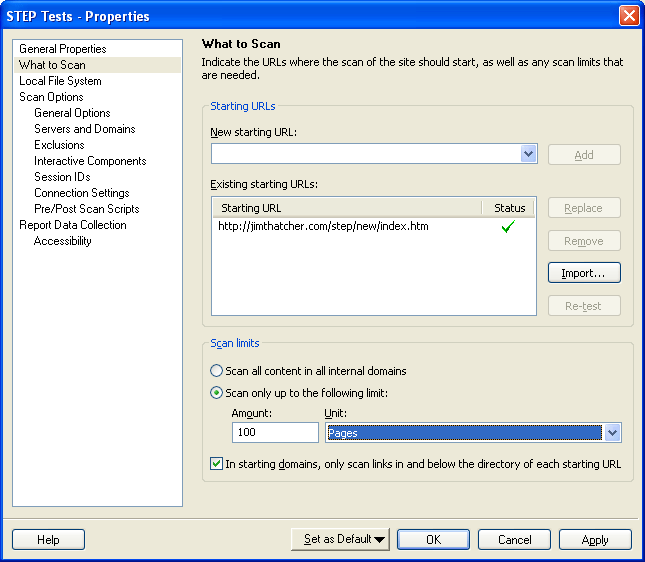
Figure 13-3. Specifying files to scan in Bobby.
The Scan
limits portion of this dialog
box is disappointing. Rather than a click depth, only the number of pages (or
directories) is allowed to limit the scan. That's not a problem for our test
files, but for a site with more complicated structure, the numeric limit may be
very different from the click-depth limit. It would seem that if the process of
analysis is multithreaded, even successive runs might end up with different sets
of files. And depending on the algorithm for finding the 100 files, the
selected files might all be down one branch of the site's tree, as opposed to
sampling broadly across all branches (which is what click-depth constraints
do).
Select the OK button, and back in the main window, use
the menu to scan the entire site (Scan > Scan Entire Site
) or click the green arrow to the
right of the URL entry field at the top of the window.
Like Ramp, WebKing, and InFocus, Bobby lists files in the left pane of the user interface, as shown in Figure 13-4. When any file is selected, the report is displayed on the right. In the right pane, you can choose to see the raw HTML of the page, a preview of the page, and a list of pages associated with the current highlighted item.
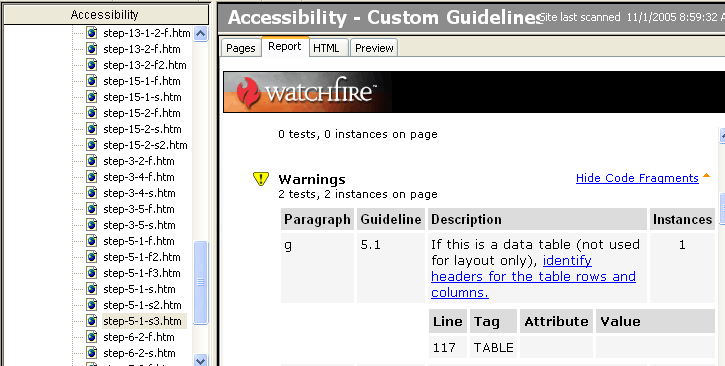
Figure 13-4. Examining the results in Bobby.
The report has a lot of unnecessary formatting (the Watchfire logo and widely spaced tables) that actually serves to hide the important information. With patience, you can step through each of the files and determine whether or not Bobby 5.0 passes the various issue tests.
Report formats in Bobby 5.0 are disappointing. There is no way to view the results of the Bobby 5.0 analysis except by viewing reports in the Bobby user interface. There is no way to save the report or share it with someone—well, almost no way.
It is possible to obtain an XML report, but first you must edit the
Windows registry key HKEY_LOCAL_MACHINE\SOFTWARE\Watchfire\WebXM\2.0\WFScan, adding a string value with name BobbyLog and a value that is the path and filename
for the XML output file. I used C:\bobby.xml for simplicity. Be sure to copy that file
to some other place (or to some other name), because the next time you run
Bobby 5.0, the XML file will be overwritten. Before you edit the Windows
registry, be sure to make a backup (see http://support.microsoft.com/kb/322756).
I used InFocus Version 4.2.2 for these tests. SSB offers an InFocus Enterprise product, and I was told that the analysis engine is the same for the two tools.
After starting InFocus, open the Testing Control dialog box (Configuration > Testing
Control
). As shown in Figure 13-5, the Testing
Control
dialog box offers a welcome option: Manual
Checks OFF
. After reading the caution to not use color alone to convey
information on every page for 100 pages, you get very tired of the advice. It
is important not to use color alone to convey information, but we are smart
enough (I hope) to not need to be reminded of that fact at every
turn—well, on every page. InFocus is the only tool that provides a single
option to turn off all those tests.
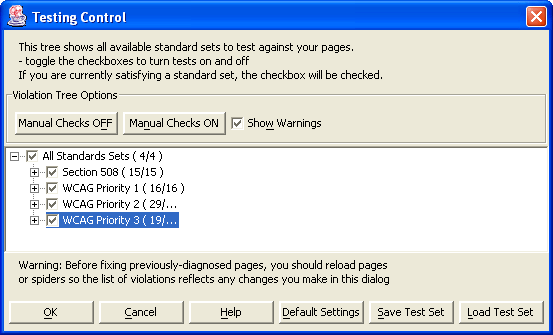
Figure 13-5. Choosing tests in InFocus.
The simplest way to select all Section 508 and WCAG Priority 1 and 2
(nonmanual) tests is to make sure that all tests are checked. Then uncheck WCAG Priority 3 and select Manual
Checks OFF
.
The Show Warnings
check box next to
the Manual Checks
buttons has nothing to do with
the tests themselves, and that is confusing at first. These are warnings that
appear as you turn on or off selected tests.
For example, if you turn off the check for frame titles in Section
508, you are warned that this is also turning off the frame test in WCAG, as
shown in Figure 13-6. You can decide that you don't want to be bothered by
those warnings by unchecking the Show Warnings
check box. This decision is superior to the one found in, for example, LIFT
Machine, where it is necessary for you to manually turn off all occurrences of
any given test.
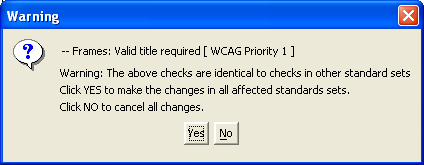
Figure 13-6. A warning dialog box about rules shared between Section 508 and WCAG.
This is only the beginning of tailoring your test procedure with InFocus. Many of the tests
take parameters. For example, the test for valid alt-text excludes alt-text
that is too long or contains certain words. These options are set in the Test Settings Editor
dialog box (Configuration > Test Settings
),
as shown in Figure 13-7.
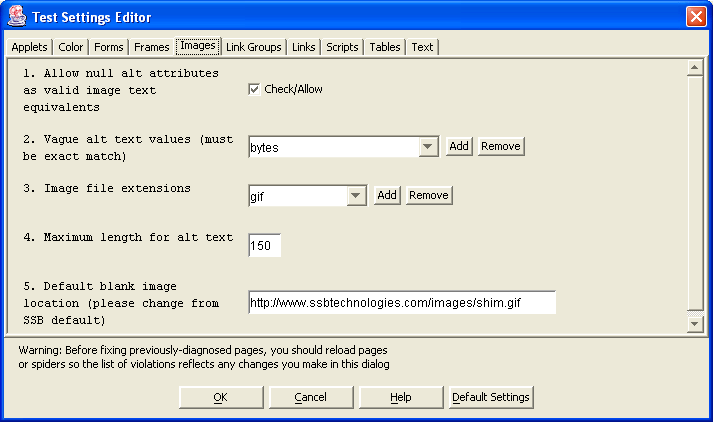
Figure 13-7. Test settings for InFocus.
Many of the tests depend on settings like the ones shown in Figure 13-7. One of the most interesting pages in this dialog box is the one that determines which table elements will be considered to be data tables.
After choosing the tests to be used, you want to set up the test file analysis. If you want to check a single file, just enter it in the URL field at the top of the main window and press Enter.
For the sample test files, you need to spider to depth 1 for the
test files. To do this, click the spider icon or choose Edit > Create Spider
from the menu. The Create
Spider Wizard
has seven steps:
Enter the URL in the first step, as shown in Figure 13-8.
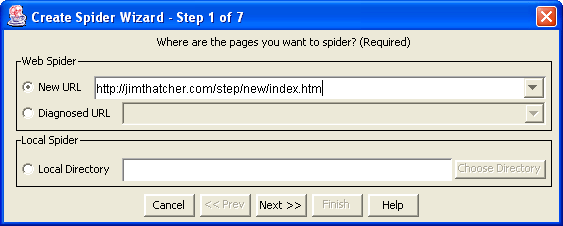
Figure 13-8. Setting up the spider in InFocus.
Choose
the report format and report location, as shown in Figure 13-9. The options for
report format are XML, Evaluation And Repair Language (EARL), XLS (Microsoft
Excel spreadsheet), or HTML. In this dialog box, be sure to check Add Generated Pages to History
(it is not checked by
default). With this setting, you can check out the errors using the InFocus
interface, which is much easier than using one of the reports.

Figure 13-9. Choosing report options with InFocus.
Choose
how to determine the number of files to be analyzed, as shown in Figure 13-10.
It is recommended that you keep this number relatively small—less than 100.
If you want to scan more than that, you probably need to consider using the
InFocus Enterprise product instead. InFocus uses the term "page depth
"
for what I think of as "click depth
"—the number of mouse clicks or links followed from the start page you specified in Step 1 to the
analyzed page. You can also specify the maximum number of pages and the maximum
page size.
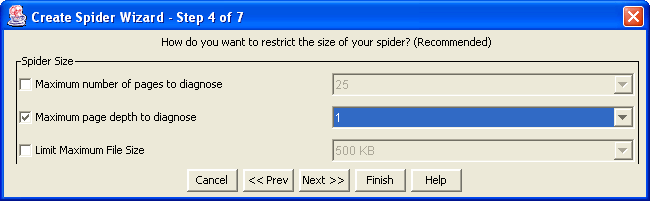
Figure 13-10. Choosing the extent of the scan with InFocus.
Finish. You'll go to a window that will display the progress of the scan after you select
Start.
It is especially easy to run through the test file results with the InFocus user interface. Most issues require looking at two files: the good one and the bad one, so to speak. As shown in Figure 13-11, you can highlight the two files in the tree view on the left and open the tree to list the errors detected.
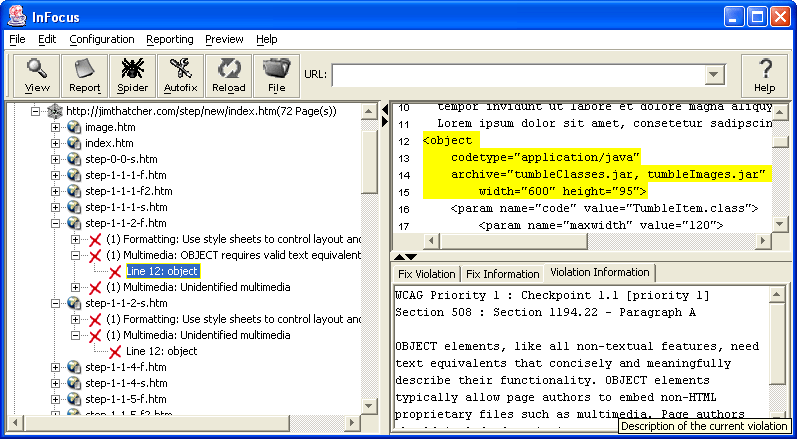
Figure 13-11. Examining errors in InFocus.
The issue being examined in the example in Figure 13-11 is "Object
requires default content
" (test 3). The two
files are step-1-1-2-f.htm (the
failing file—with an error) and step-1-1-2-s.htm (the successful file—no error). In Figure 13-11, the tree is
opened at those two files. The one that should fail (no default content) does
indeed invoke an error: "
" The
file in which that alternative content is provided does not have that error. In
this way, you can go through each of the issues, check the corresponding files,
and determine how InFocus fares on the tests. It is much easier to make these
comparisons here with the InFocus user interface than in the various reports
that are available.OBJECT requires valid text equivalent.
If, during Step 3 of the spider definition (Figure 13-9), you specified a report type and location,
the InFocus report will be there when the analysis completes. You can create additional
reports by going to the main menu and choosing Reporting > Generate Reports
. The Generate Report
dialog box allows you to select
individual files or spidered directories as the subject of the report, as shown
in Figure 13-12.
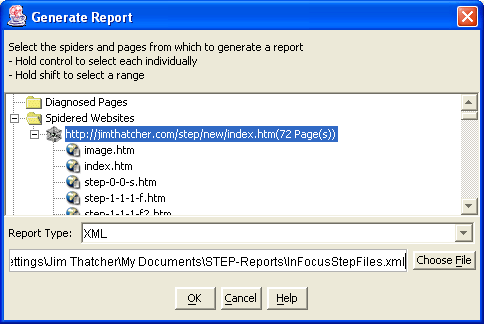
Figure 13-12. Selecting report formats in InFocus.
The options for the report type are HTML, XML, Microsoft Excel, or EARL. InFocus is the only tool to include EARL as a report format option.
LIFT Machine is a server-based testing tool from UsableNet. You log on to the LIFT Machine server to set up scans of desired websites. You can be notified by e-mail when a job finishes, or you can just wait. Depending on the size of the scan, it may not take very long.
Before Deque and Parasoft modified their tools (and improved their scores), LIFT Machine had the best score of 27 out of 40, or 68 percent.
LIFT Machine has a wide range of configurability, which I consider to be very valuable. But there were a number of issues in that configuration process that were distracting.
LIFT Machine offers many choices for sets of tests. The main window has a set of tabs, as shown in Figure 13-13.
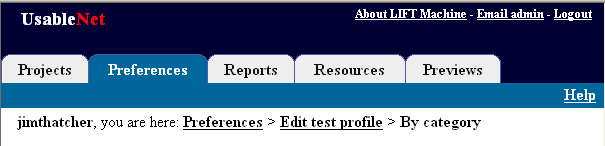
Figure 13-13. The tabs for the LIFT Machine user interface.
Choose the Preferences
tab. The Preferences
page has four groups of settings: Test profiles
, Spider profiles
, User interface settings
, and Account settings
. We are interested in the test
profiles. Expand that section and select Duplicate
for the W3C/WCAG 1.0 priority 1 & 2
profile. Since
that test profile is shared among users of LIFT Machine, you cannot edit it
directly. Instead, you can make a copy (duplicate), give the copy a name, and
then edit the copy. Select a name for the copy and choose Save
. LIFT Machine then opens screen to edit the copy
you have created, as shown in Figure 13-14.
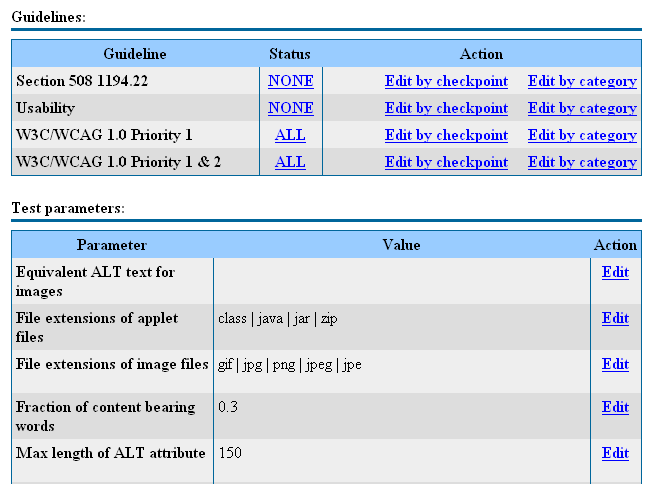
Figure 13-14. LIFT choices for editing a test profile.
In Figure 13-14, notice that all of the WCAG Priority 1 and 2 tests
are included, and none of the Usability or Section 508 1194.22 tests are
selected. If you were to choose all of the Section 508 tests now (just click NONE, and it will change to ALL),
many tests will be
duplicated. As an alternative, select Edit by checkpoint
on the Section 508
line, and then change
to NONE
on both ALL
508 (n) Forms
and 508 (o) Skip
Menus
. Then return to the test profile editor by selecting the Edit test profile
link at the top of the main page (see
Figure 13-13).
This process creates a new test profile, which you can now use in the analysis of the test files.
To analyze the files, you should
set up a project (as with the other tools). Choose the
tab in the main window (see Figure 13-13) and select Projects
New Project
. The choices are quite simple, as shown in
Figure 13-15. But be careful. If you decide to edit the spider profile, for
example, when you come back to the project page, some of your choices will have
disappeared.
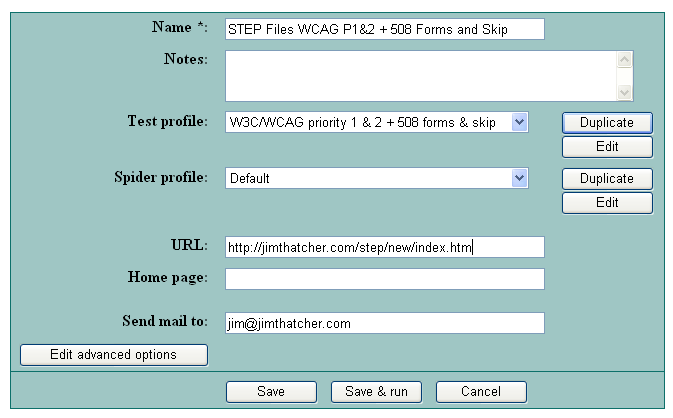
Figure 13-15. The choices for a LIFT project.
Be sure to pick a name that will distinguish this project from other projects, because only the name appears elsewhere in the process.
Choose the test profile W3C/WCAG priority 1
& 2 = 508 forms & skip
, which was created when you chose the
tests. The default spidering profile is unlimited in click depth but limited to
250 files. That will easily cover the test files. Don't forget to add the
starting URL (https://jimthatcher.com/step/new/index.htm). This could be part of the spider profile or not, as you wish.
Since you are using the default spider profile, you must add the URL here.
When the parameters are set, choose Save
& run
. This submits the job to LIFT Machine. You will receive an
e-mail when the job is done, or you can sit on the project page and wait,
hitting refresh (F5) occasionally. For large projects, I would not advise
that process.
In my case, the progress indicator specifying the total number of pages completed got stuck at 23 pages (a minor bug), so that the progress read, 45 of 22 pages, 55 of 23 pages, 67 of 23 pages, and then finally completed 70 pages. Figure 13-16 shows the final status report. The testing took less than two minutes.
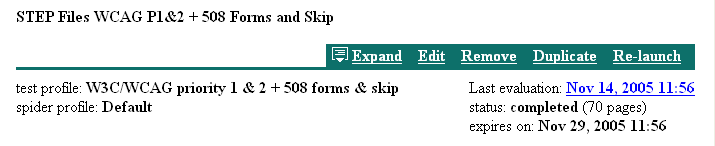
Figure 13-16. The item on the projects page for the completed project.
Now let's find the results of this evaluation. The date of the last evaluation, Nov 14, 2005 11:56
, as shown in Figure 13-16 is a link.
Follow that link to display a summary of the overall status, indicating how
many pages had errors and how many did not. Our test pages did not fare well.
The summary page indicated that there was only one page without any problems
(in fact, it wasn't even a page, but rather something called SITE LEVEL ISSUES
, which I haven't figured out yet).
From the summary page, there is a link, view
failed pages
, and that is what you want. Then from the list of failed
pages, you can examine the individual reports for each of the files to
determine whether or not the tool passed each test. A sample individual report
for the file step-0-0-0.htm is shown
in Figure 13-17.
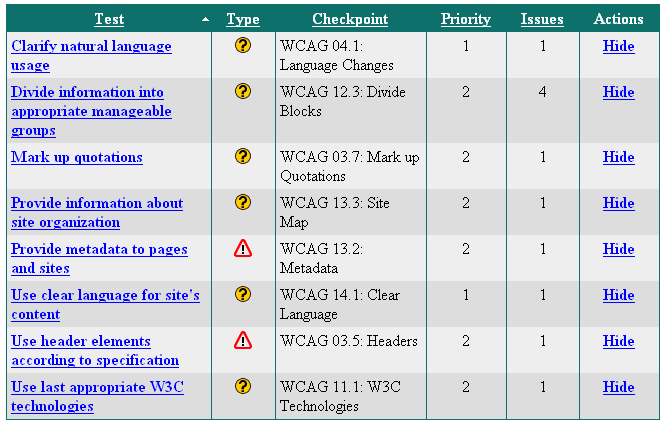
Figure 13-17. LIFT sample report for a single page.
The subject file has no errors, several manual checks, and two warnings. A neat feature in looking at the reports here, rather than downloading them, is that you can decide to hide issues and they won't appear when you look at subsequent pages. If you made a mistake in setting up the tests, you may get duplicate rules—one coming from Section 508 and one from WCAG. It seems to me that there should be one rule that belongs to both the Section 508 set and the WCAG set, but if you end up with such duplicate rules, you can hide them here and they will not appear on subsequent pages.
Choose the Reports
tab in the main window (see
Figure 13-13) to move to the Reports
page of LIFT
Machine. Then choose the New report
link, just
under the tabs. The Reports
page offers several
options, both in format and in detail, as shown in Figure 13-18.
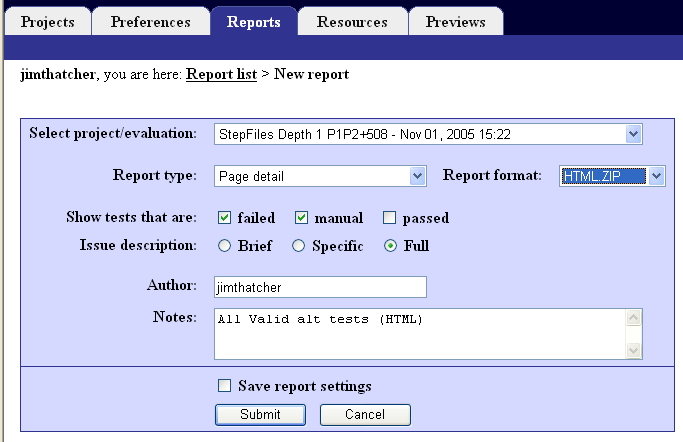
Figure 13-18. Choosing report details in LIFT.
The report type can be either detailed or an executive summary. The format can be HTML or XML. Other choices include whether or not to include manual checks, passed tests, and failed tests, and whether the issue descriptions should be brief, specific, or full.
After you submit the request, LIFT Machine creates the report. It
usually takes a couple of minutes, and, as with the scan, you can wait for an
e-mail notification or just refresh the page after a minute or two. The format
is a single zip file, called getreport.zip as a default. When the report has been prepared, the report name
(project name plus date) becomes a link (similar to the situation when the scan
was finished, as you saw in Figure 13-16), which you can activate to download getreport.zip. I suggest changing the name at this point (in the Save As
dialog box), so that you don't risk overwriting
a different report from LIFT Machine.
Ramp Ascend is an accessibility testing and remediation tool from Deque Systems, Inc. I first tested with Ramp Ascend 4.0 and reported my results to Deque Systems. The next version of this testing tool, Ramp Ascend 5.0, improved over their previous version by 7 points, or 25 percent. Ramp Ascend Version 6 was released in May 2006. With a beta copy of that version, the tool's score improved another 7 points to have the best score of 38 out of a possible 40. The company's response to the challenges of the tests and to comments about Ramp's user interface was absolutely outstanding.
Ramp is also available without the repair function, called Ramp Grade for $279, which would have worked just as well for our tests, and then without spidering, RampPE (Personal Edition) for $79. Deque also has an enterprise version, called Worldspace. All versions use the same analysis algorithms.
After opening Ramp Ascend, open the Accessibility Options
dialog box (Tools > Accessibility Options
)
and choose the Analysis tab, as shown in Figure
13-19.
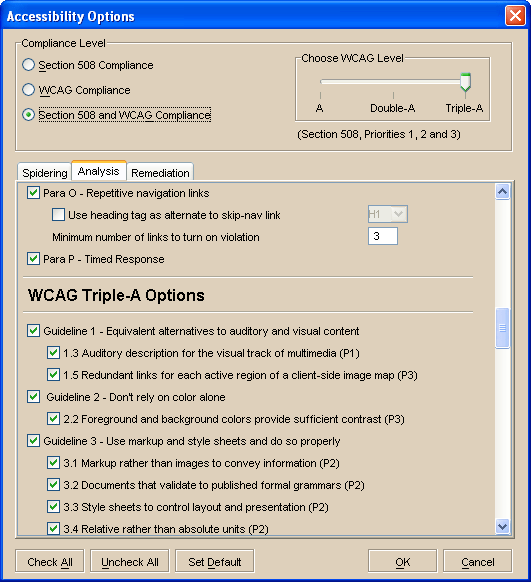
Figure 13-19. Choosing the tests in Ramp Ascend.
In Ramp 4.0, you could choose only Section 508 or Web Content Accessibility Guidelines Priority 1, Priority 1 and 2 or Priority 1, 2, and 3. As with Bobby, the compliance selections were alternatives (radio buttons), so you could select either Section 508 or WCAG, but not both. In order to get the Section 508 tests and the WCAG AA tests, it was necessary to make two runs. That has changed in Ramp 6.0, as indicated in Figure 13-19.
Another disappointing aspect of Ramp 4.0 was the fact that the WCAG compliance level was not accurately represented in the detailed list of checkpoints/tests. But that, too, has changed in Ramp 6.0, as also indicated in Figure 13-19.
To eliminate the "manual checks,
" I went through and
unchecked those items that I thought would result only in warnings, like "Clearest
and simplest language,
" Checkpoint 14.1. Another improvement that Ramp
might make is to add an option to eliminate manual tests, as is available with
InFocus.
Having chosen the tests, it is a simple matter to check
the test files. All you need to do is enter the URL in the text box at the top
of the main user interface window, select 1 for
the Link Level
(left of the URL field), and select Analyze
,
as shown in Figure 13-20.
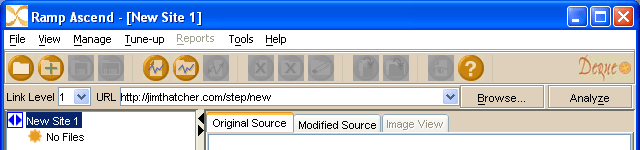
Figure 13-20. The Ramp specification of parameters for the analysis.
You can also set up the analysis using the Analyze
Web Application
dialog box (File > Analyze Web Application
). There were no significant
advantages to going that route in what I wanted to do. However, when set up
that way, a web application can be respidered with no input required from the
user, because session and state values are stored in the web application script
and used automatically.
The method of examining test files is similar to what is available with InFocus.
The user interface includes a list of files, and each can be highlighted to
expose the source code and a list of violations in the right panel of the user
interface. However, Ramp has one important addition: an Interactive
Checks
section at the bottom-right side of the window, as shown in
Figure 13-21.

Figure 13-21. The Ramp interface for examining error results.
The presence of these interactive checks for a given file is indicated by a plus (+) icon in the file list. Errors are present in files marked with a red X, and a clean bill of health is shown with a green checkmark. With the interactive checks, the tool is asking for help to clarify the role of certain features of the page. All four files with interactive checks shown in the example in Figure 13-21 are files with data tables. The check is to confirm (or deny) that they are data tables—even to decide between a simple table (two-dimensional table) and a complex data table (n-dimensional table).
My test case for data tables was specifically designed to see if the
tools recognize data tables or can distinguish data tables from layout tables,
at least in what I would call "obvious
" cases. Although Ramp is
looking for confirmation, the tool has drawn the distinction. The file with a
layout table (step-5-1-s3.htm) is not called out for an interactive check, whereas the files with data
tables require the interactive confirmation. In other words, Ramp is raising
the interactive check for tables in just those cases where the tables were, in
fact, data tables.
The downside to the interactive check
idea is that you may need to interact too often. If you chose all the Priority
1 WCAG tests, you will get the interactive check "Are there foreign
words/phrases used in this document
" on every file. That user check seems to be the first, so you need to answer
it before others in the queue. You may quickly realize that it is best to
uncheck that test in the Accessibility Options
dialog box. On the other hand, that seems to be the only interactive check
elicited on every file. These interactive checks provide a valuable addition to
the process with some costs in user involvement. According to Deque, its enterprise
product streamlines this process significantly.
The process of examining the files is simple. The errors are displayed on the right, as is the source code, as shown in Figure 13-22.
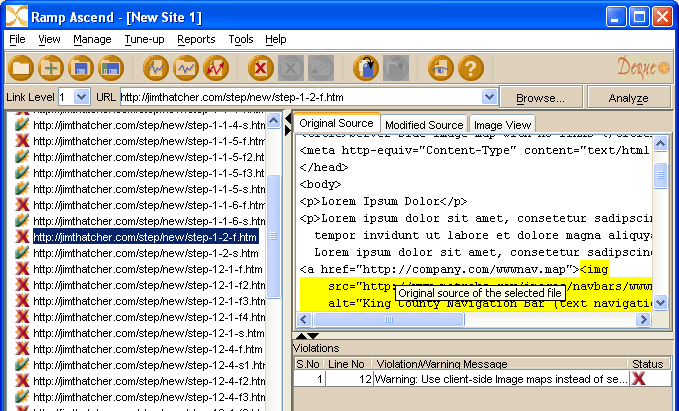
Figure 13-22. Examining the results with Ramp.
The reports are available in XML and HTML formats. For the XML report, select Reports > Generate XML Report
from the main menu. Be sure that the site, not one of the files, is highlighted
(selected). Each report opens in a Ramp window, but you can view it in the
browser (Report > View
in Browser
) or save it as HTML.
All the HTML reports are derived from the XML output. They range in
detail from a site synopsis to a listing of all violations together with code (Reports > Violations Code All
Files
). Ramp includes a Report Wizard (Reports > Report Wizard
), which lets you choose the tests you
want to include.
WebKing Version 5.1, from Parasoft, Inc., is much more complex and powerful than any of the other tools discussed so far. Testing for accessibility is only a very small part of its function. As with the other products, you can modify which tests are to be used, but with WebKing, you can also write your own tests or modify the ones provided, and the results are available across several platforms.
To see the basic choices for existing rules, select Tools > Customize
, and then select Check Web Accessibility
on the left side of the Customize Tools
dialog box, as shown in Figure 13-23.
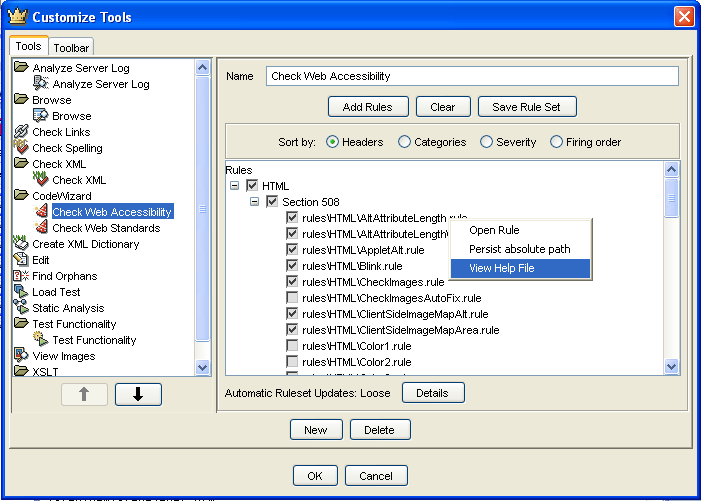
Figure 13-23. Choosing tests in WebKing.
The rules tree in the Customize Tools
dialog box has two nodes under HTML: Section 508
and WAI Guidelines
.
Under each of those two is a list of check boxes for rules to be included. The
text for each rule is actually the filename of the rule, like rules\HTML\Blink.rule. If you right-click any rule, the context menu (see Figure 13-23)
includes options to open the rule (note that it opens in the main window behind
the dialog box) or to view the help file, which describes the function of the
rule. Rules can be sorted by Headers
information
(Section 508 and WAI), by Categories
(accessibility, navigation, and presentation), by Severity,
or by the order in which the rules are applied by WebKing (Firing Order
).
The sorting by Section 508 (as partially shown in Figure 13-23) and
by the WAI Guidelines is misleading because rules are listed only once. The
rules listed under Section 508 are not repeated under WAI Guidelines. The rules
that appear under WAI Guidelines are only the ones that support WCAG
checkpoints that are not found in Section 508. For example, the CheckImages.rule
rule listed under Section 508 (Figure
13-23) is the one that checks for alt-text and thus implements WAI Checkpoint
1.1, but it appears in the Section 508 list, not in the WAI list.
To begin testing for accessibility, you need to create a project. Select File > New > Project
and select the Project
tab to give a name to the project. Then use the Source
tab to specify the parameters of the scan, as shown in Figure 13-24.
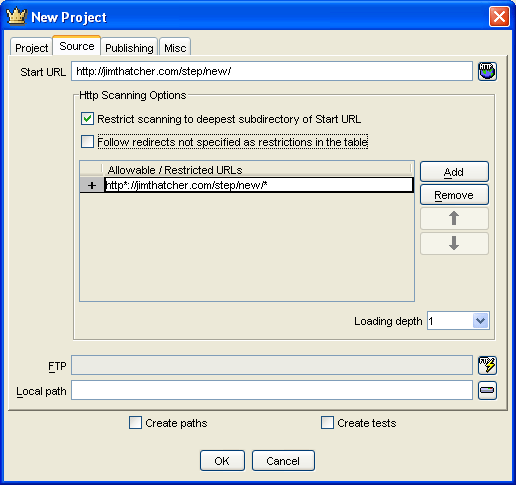
Figure 13-24. Creating a new project in WebKing.
Enter the URL in the Start URL field (https://jimthatcher.com/step/new/ in the example). The Loading depth
(click depth) setting defaults to 1, which is
what we want for the test files. Select OK
, and
then WebKing will load the site with user intervention for entering data in
form controls. The first time I was given that opportunity, I chose skip all for the forms, which meant that further user
intervention was not required. Note that this process does not perform any analysis on the files; it does only the specified
spidering and loads the files.
Once the project files are loaded, they are represented in the project tree on the left side of the user interface. From this project tree, you can perform analysis and transformation operations on files or, more generally, on subtrees of the project tree.
Highlight the root of the project tree, and then
select Tools > Code
Wizard > Check Accessibility
. This will
evaluate WebKing accessibility rules against all the files in the tree and
produce the results displayed on the right panel of the user interface, as
shown in Figure 13-25.

Figure 13-25. Examining results of the WebKing Check Accessibility tool.
The results window (see Figure 13-25) lists all the errors and warnings. For our process, we just check if an error has been raised when it should be raised, and when necessary, check that no error has been found for the comparison files.
When I first ran these tests with WebKing version 4.0, the tool received the lowest score of 18. With version 5.1, WebKing's score is 34, the second highest; and almost doubling its performance.
To see the report format choices, make sure that the Check Web
Accessibility results are in the right pane of the WebKing window. (If you changed the contents of that pane, you can return to the
accessibility results by selecting Window > Windows
, choosing Check Web
Accessibility
, and then choosing Show
.)
The reports are not available from the main menu. Instead, right-click the
results window and select Save As
. As shown in
Figure 13-26, your choices are HTML, text, XML, binary, or CSV format.
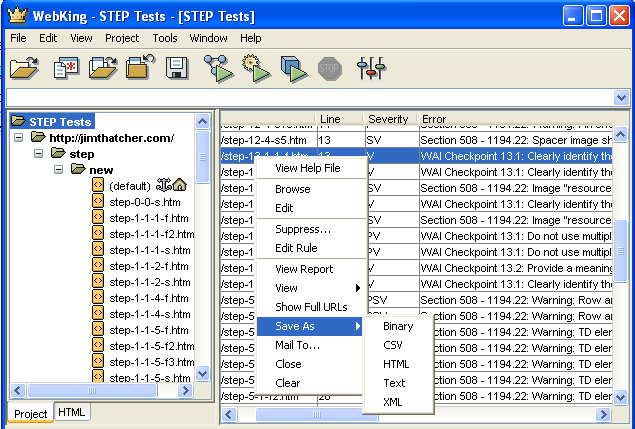
Figure 13-26. Choosing a report format.
The report is saved as a single file with the same contents as those that appear
in the Check Web Accessibility
panel (right side)
of the interface.
WebXM, from Watchfire, is a server-based tool like LIFT Machine. It is very sophisticated, with many functions, as indicated by this quote from the Watchfire site:
WebXM is the only Online Risk Management platform to automate the scanning, analysis and reporting of online security, privacy, quality, accessibility and compliance issues across corporate web properties. WebXM ensures visibility and control by delivering executive dashboards that are used to identify, assign and track the issues impacting your online business.
There is much more to WebXM than accessibility. In fact, accessibility was added in 2003, after Watchfire acquired Bobby.
Because of the complexity of the tool, I won't go into details about the process of
setting up the tests and scanning the site; instead, I'll just tell you what I
did. The project concept for WebXM is a "webspace
" in which the user
sets many defaults for scan jobs in that webspace. Figure 13-27 shows the window
for picking the accessibility tests.
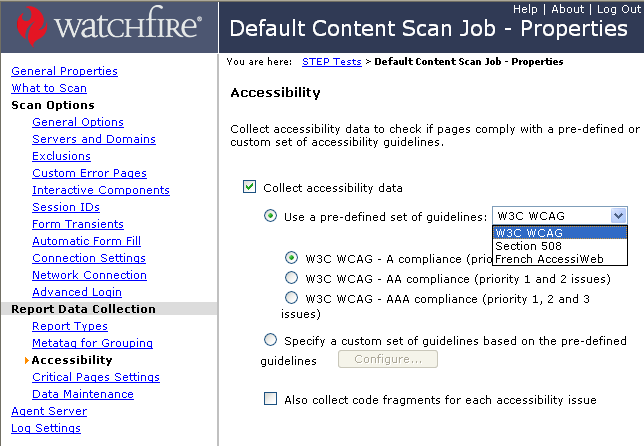
Figure 13-27. Setting default job properties in WebXM.
The Accessibility
dialog box is one of
many that can be opened from the list on left side of the Scan Job – Properties
window. The process for
choosing tests is hauntingly similar to that for Bobby 5.0. You can choose from
three guideline sets: W3C WCAG
(A, AA, or AAA
conformance), Section 508
, and French AccessiWeb
(Bronze, Silver, or Gold
conformance). Alternatively, you can select to define a custom set, and you
will be shown a list of all tests from which to choose, as
shown in Figure 13-28.
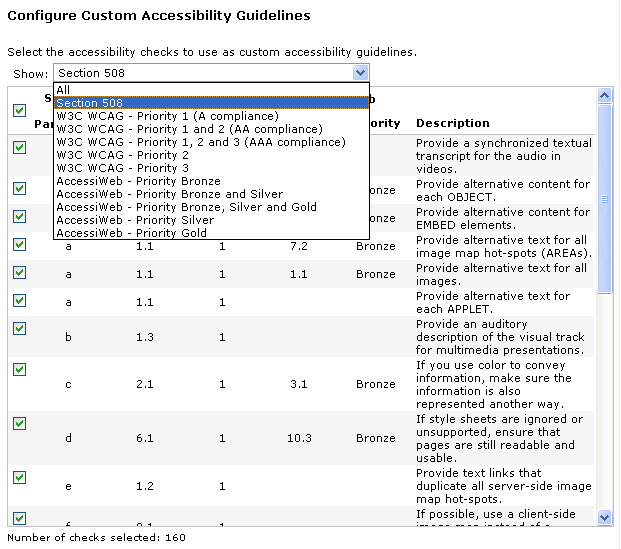
Figure 13-28. Setting up testing in WebXM.
I am not certain what technique is the best for choosing tests in
this window. I wanted to use the Section 508 tests plus WCAG Priority 1 and
Priority 2 tests. Then I wanted to go through those to eliminate any tests that
would just clutter the reports. The way I did that was to first select All in the combo box, and then uncheck everything. Then I selected Section 508
and checked those. Then I selected W3C WCAG – Priority 1 and 2 (AA Compliance)
and
checked those. However, that left many of the interesting AccessiWeb tests unchecked.
The What to Scan
option is in the collection of
navigation links on the left side of the Scan Job - Properties
window (see Figure 13-27). On the What to Scan
page, you just enter the start URL and the
usual options about what to scan. As with WebKing and Bobby 5.0, you cannot
specify a (click) depth for the scan, but you can limit the scan by number of
pages. The Watchfire technical contact explained this as follows:
Since WebXM is optimized for enterprise scanning, a given scan job is usually performed by multiple "
scan agents" that can even be installed on different servers. Those scan agents operate completely independently. Whenever one finds a URL in a link, they check the database and if it hasn't already been stored, adds it to the queue for later scanning. When an agent finishes scanning a page, it pops whatever URL happens to be on the top of the list and scans that, even though a different agent may have put that URL on the list.
But the technical contact also explained that there is considerable interest in the option of limiting the scan by click depth and that it may be available in a later version of the product.
The process so far established default job settings and options. In
the webspace, you now create a job (choose Create Scan
Job
from the menu on the left), which inherits all the default settings
established so far. Use the Create and Continue
link at the bottom of the page. Next, move to the Reports
link on the left of the Create Job Page
(which is
very similar to Figure 13-27), and choose the Create and
Package All
button. Finally, choose Finish
.
Then a link will be available to Run
the job.
After running the job, reports will be available in the Report
Pack
area of the webspace.
Select the Report Packs
tab in the workspace.
There, the report will be listed as a link, which you should follow. The report
window has a list of links down its left side. These provide various ways to
view the report. Figure 13-29 shows Pages with Section
508 Issues
selected.
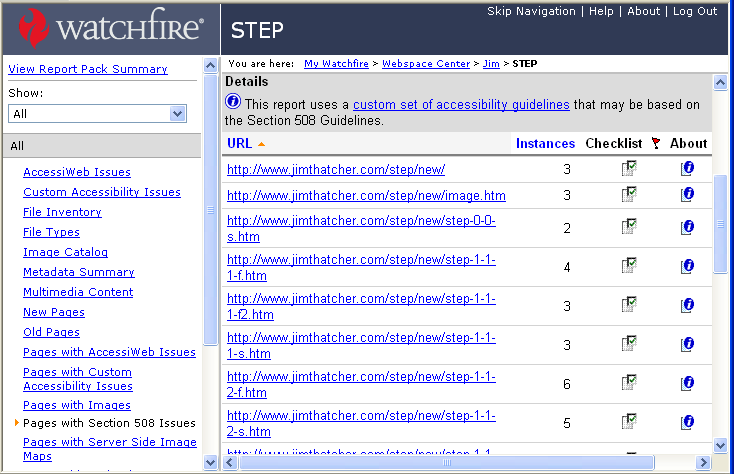
Figure 13-29. Examining the list of files with errors in WebXM.
Since I wanted to study each file, I sorted the list of files by
URL, by clicking URL
at the top of the list. Each
file can then be analyzed by looking at its report, as shown in the example in
Figure 13-30.
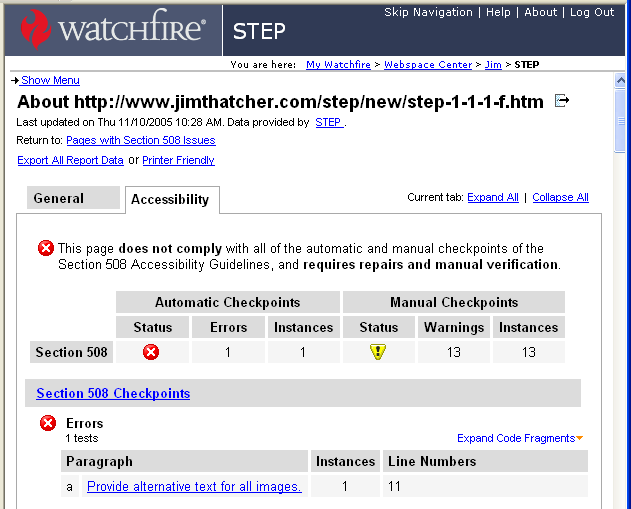
Figure 13-30. WebXM report format.
That report format shown in Figure 13-30 is reminiscent of the report format in Bobby 5.0 (see Figure 13-4). It is necessary to scroll down the report to find the errors and warnings of interest.
When you open a report, you'll see an Export All Report Data
link near the top of the page. That link will download the data of the current
view as an XML file. Alternatively, the Printer Friendly
link opens the current data as an HTML file in your web browser, and you can
save the report from there. The views include the summary for each of the
options shown on the left in Figure 13-29, and the individual reports for
specific files. I was not able to find a way of downloading a report that had
both the list of files for a set of issues and the specific errors found with each file, although I am sure that this
is possible.
When I started looking for test files to use to compare accessibility testing tools, I was attracted to tests developed by Chris Redpath at the Adaptive Technology Resource (ATR) Centre at the University of Toronto. Those tests consist of about 220 files (http://checker.atrc.utoronto.ca/), including at least one file and often several files for each of the WCAG 1.0 checkpoints. Although still in working draft form, there are also tests for WCAG 2.0.
My main concerns with the ATR tests were that there were so many files and
that many of the test files are nearly empty. For example, some files relating
to object elements had merely <object /> in the code; I think a checker could—maybe even
should—recognize that this is an empty object and raise no warning or
error.
So I decided to create a much smaller and more manageable set of files (covering many fewer conditions), in which each file contains more content and generally there are pairs of files to compare the tool's response for the error condition and the error condition corrected. Sometimes, the ATR files are paired: one file with the error condition and the other without the error condition—not with the error corrected.
The test suite is arranged by issues, not by
files. So there is the "alt-text" issue (test 1) with two files
associated with it: one in which the image has no alt-text (step-1-1-1-f.htm) and essentially the same file with the alt attribute added (step-1-1-1-s.htm) with respectable alt-text. The file-naming system stems from an
earlier version of the ATR tests. The filename includes the WCAG guideline
number, test number for that guideline, and an f for failure or s for success.
You can find a list of all the files at https://jimthatcher.com/step/new. All the files referred to in the following descriptions are
available in that directory, too; for example, https://jimthatcher.com/step/new/step-1-1-1-f.htm, which I refer to as just step-1-1-1-f.htm.
alt-text: Every image element, img, must have an alt attribute. No alt-text (step-1-1-1-f.htm) is an error, and there should be no error when alt-text is present (step-1-1-1-s.htm).
Results: All of the tools passed this test—no surprise here.
ASCII art for alt-text: If alt-text is ASCII art, like alt="—
>", a screen reader would speak "hyphen hyphen greater than,
" which is not meaningful. It is an error when alt-text consists of ASCII art (step-1-1-1-f2.htm).
Results: On my first appraisal of the results of this test, I thought that InFocus caught the error. I was concerned because the error was "
" which means that the Alt text required,alt attribute is missing. When I tried different ASCII art, namely alt=":-)", InFocus did not pick it up as an error. From the highlighting of the source code in the original case (alt="—
>"), it turned out that InFocus was prematurely terminating the img tag with the ">" at the end of the value of the alt attribute, and did not actually catch this error.
For each of its alt-text errors, LIFT had both "image should have valid
"
and "altimage should have equivalent
" Lacking valid alt.alt-text is an
error, while the equivalent alt message is a human review warning saying it is
necessary to compare the image with the alt-text. Since that warning is raised
on any significant image, it would seem that LIFT would need to say that the
ASCII art for alt-text is not valid, but it did not do that. Compare this with
test 5, where LIFT declares alt-text longer than 150 characters to be "not
valid.
"
WebKing and Ramp were the only tools to pass this test, and both did so with later versions; they failed the test the first time through.
Object requires default content: An object element should have content that is available if the object/plug-in is not supported (step-1-1-2-s.htm). Though this is a requirement of WCAG 1.0, it is not widely supported by assistive technology. A testing tool scores on this issue if there is no warning or error on the good file (step-1-1-2-s.htm) and there is a warning or error on the bad one (step-1-1-2-f.htm), which has no default content.
Results: All of the tools passed this test.
Image button: Every image button (input element with type="image") must have alt-text that specifies the purpose of the button (step-1-1-4-s.htm, step-1-1-4-f.htm).
Results: Technically, all six tools caught this error, but WebXM received a failing grade because of the way it presented the issue. WebXM raised the form-labeling error for this test: "Explicitly associate form controls and their labels with the
" That error is not raised for the file that has <label> element.alt-text on the image button (step-1-1-4-s.htm). In this version, WebXM considers the alt-text on an image button to be a form-labeling problem, not an alt-text problem.
Both test files have an input element with type="text", which is correctly labeled. InFocus raises the error "Label should be placed next to input
" whenever there is an input element; even when the prompt (label) is perfectly placed and labeled. This stems from WCAG 1.0 Checkpoint 10.2:
Until user agents support explicit associations between labels and form controls, for all form controls with implicitly associated labels, ensure that the label is properly positioned.
But a testing tool should be able to estimate positioning and raise this issue only when it is really necessary, especially because user agents do support explicit associations between labels and form controls.
Long alt-text: alt-text should be short, succinct, and to the point. How long is too long? I chose 151 characters (step-1-1-5-f.htm) as the break-off point that should raise an error. There is also a file with 102 characters of alt-text (step-1-1-5-f2.htm), which I think should be an error, too.
Results: All of the tools caught the error of alt-text longer than 150 characters. None of the tools raised an error for 102 characters. Several tools (InFocus, Ramp, and LIFT) allow user specification of the maximum length, along with other characteristics of acceptable alt-text.
InFocus raises the violation "Valid
" As mentioned in the description of test 2, LIFT also raises an error about validity of the alt attribute required.alt-text. What is troubling is that the alt-text at 151 characters is certainly valid, but too long. The detailed explanation of the InFocus violation softens this concern with "This image has an invalid or suspicious
" On the other hand, Bobby warns, "alt attribute.
" making the statement of the error/warning perfectly clear.Alt text > 150 characters, consider providing a separate description,
Image map areas: Every area element of a map for a client-side image map needs to have alt-text. The sample file (step-1-1-6-f.htm) has one <area> tag that has no alt-text. For comparison, step-1-1-6-s.htm has alt-text on all the area elements.
Results: All of the tools passed this test. WebXM did fine on this test, but I noticed that the test itself, "Provide alternative text for all image map hot-spots,
" is also listed in the section of the report called Passed Evaluations
. The reason the test appears in the list of evaluations that passed is that there are several image map area elements that do have alt-text, and for those elements, the evaluation passed. I think that the idea should be that the page passes the "image map hotspot
" test if all image map hotspots have appropriate alt-text, and it fails if any one does not.
Server-side image maps: I believe that a server-side map (img with ismap attribute) should never be used, so any page with a server-side map should raise an error. There are two test files: one with the server-side map and no text links (step-1-2-f.htm) and, just for interest, step-1-2-s.htm is coded with text links provided for each server-side hotspot. The tools get this right if they raise an error or warning for the server-side map (on either or both files).
Results: All of the tools got this right, but usually by raising a warning. Bobby has a warning, "Provide text links that duplicate all server-side image map hot-spots.
" It is a warning because the tool can't tell whether or not the duplicate links are available. I think that this should be an error, or at least a stronger statement about the problem with server-side image maps. Checkpoint 9.1 of WCAG and §1194.22(e) of Section 508 use the same wording concerning the use of server-side maps:
Provide client-side image maps instead of server-side image maps except where the regions cannot be defined with an available geometric shape.
It may be impractical to use client-side image maps, but all regions can be defined by available geometric shapes. Ramp's response is also a warning, but the wording is better: "Use client-side image maps instead of server-side maps.
"
Frame titles: Each frame in a frameset needs a title attribute indicating the purpose of the frame. In the sample file (step-12-1-f.htm), the frame elements do not have title attributes. For comparison, step-12-1-s has adequate title attributes. (iframe is treated separately in test 40.)
Results: All of the tools passed this test.
Quality of frame titles: The title attributes on the frame elements must be meaningful. Here (step-12-1-f2.htm), the sample frames have title="top", title="left", and title="right", which are not meaningful—they do not specify the purpose of the frame.
Results: On the first round of tests, only InFocus go this right. With updated versions of the products, Ramp and WebKing raised errors here. Again, as with test 5, some tools allow personalizing the words or phrases that will not be allowed in the title attributes of the frame elements.
Input element needs label: The first form example (step-12-4-f.htm) is just a text input field (type="text") with neither a title attribute nor an associated label element. This condition should raise an error. The same form using the label element (step-12-4-s.htm) is correct and should not raise the error.
Results: All of the tools passed this test.
Use of title attribute for form control: Another way to explicitly specify prompting text for a text input field is to use the title attribute on the input control. This is illustrated in step-12-4-s4.htm. There should be no error or warning for this file.
Results: Only three of the six tools—InFocus, Ramp, and WebKing—got this right. This is disappointing. As argued in Chapter 8, there are situations where the title attribute is the only reasonable way to precisely label a form control.
Text intervenes between label and control: The text that is enclosed by the label element does not need to be right next to the control. Here, the label element encloses text, but there is intervening text before the control is encountered. This file (step-12-4-s3.htm) should not raise an error or warning.
Results: InFocus insists that prompting text must be properly placed. Using the label element frees the developer from that requirement by programmatically connecting the prompt with the control, at least for people using assistive technology. For others with cognitive impairments or low vision, the positioning can be critical. Unfortunately, InFocus raises this warning even if the prompt is perfectly placed. Since I wanted to find out if the tool accepts a label coming from a place that is not next to the control, I concluded that InFocus failed this test. The other tools passed.
Prompting text from two places: Not only does the labeling text not have to be adjacent; it can come from two places. It is perfectly legitimate to have two label elements with the same for attribute, as this file (step-12-4-s6.htm) demonstrates. As you learned in Chapter 8, assistive technology support for two labels is spotty at best, but this should not be an error.
Results: All of the tools passed this test. I suspect that the tools didn't even notice that there were two labels. Since support by screen readers for this situation is so poor, this probably should be deemed an error.
An invisible GIF holds the prompting text: A common phenomenon on http://www.ibm.com is to use an invisible GIF with alt-text as the prompt for the search form text-entry field. This technique was introduced by IBM at a time when few tools recognized the title attribute (see test 11). Although this technique is acceptable—it is not an error—the title attribute is much better (see Chapter 8). The file, step-12-4-s5.htm, uses an invisible GIF with alt-text in the label container. It should not raise an error.
Results: All of the tools got this right, but there were two minor problems. InFocus continued to warn that prompting text must be properly placed, and WebKing raised the error that a spacer image requires alt="". When it is clear that the "spacer image
" is conveying information, as is the case here, that warning should be turned off.
Label that matches no control: This form example, step-12-4-f2.htm, has a label element, but the for attribute does not match any id. This is an error.
Results: All of the tools passed this test.
Two input elements with same id: In this case (step-12-4-f3.htm), there are two input elements with the same id. Not only is this an accessibility error, but it is also invalid XHTML (using the same id on any two elements).
Results: Surprisingly, on the first testing pass, this was detected only by LIFT. The newer versions of WebKing and Ramp now find this error. So, LIFT, WebKing, and Ramp passed this test.
Textarea needs label or title: This file, step-12-4-f8.htm, contains a textarea with no label element or title attribute. This test is just like test 10, except it uses a textarea field instead of an input field with type="text".
Results: All of the tools passed this test.
Select menu needs label or title: This file, step-12-4-f9.htm, contains a select menu with no label element or title attribute. This test is just like test 10, except it uses a select menu instead of an input field with type="text".
Results: All of the tools passed this test.
Inaccessible select menu: This file, step-12-4-f10.htm, contains a select menu that is open (size="4") and has an onChange event handler that opens a new page. This menu is not accessible because it cannot be operated with the keyboard. As soon as you press the down arrow when the menu has focus, it fires and the new page is opened. This is an error, but the tool scores here only if it does not flag step-12-4-s10.htm as an error. That file is the same, except the select menu is not open (size="1"), which can be handled from the keyboard using Alt+down arrow, and then the up and down arrow keys.
Results: Ramp raises an error on both files. Only WebKing got it right.
Empty label: This file (step-12-4-f11.htm) has a properly coded label element, but the contents of that label element are empty. This is an error.
Results: It is surprising that apparently only two tools (WebKing and WebXM) were looking at the "quality" of the label on the first pass through the tests. Version 6.0 of Ramp now looks at that aspect of form labeling, so three tools passed this test.
Inadequate link text: The link text is click here (step-13-1-1-f.htm), which is an error.
Results: InFocus and LIFT missed this. Bobby flags an error for the click here link: "Create link phrases that make sense when read out of context.
" The same message appears as a warning (see test 22) any time links are present.
Image link with empty alt-text: An extreme case of inadequate link text, this file has an anchor containing only one image, and that image has empty alt-text, alt="" (step-13-1-1-f2.htm).
Results: InFocus is the only tool to fail this test (and test 23). Ramp lists the violation as "invalid text equivalent for image.
" It would seem that if the text equivalent were invalid, it would be invalid in test 24, which it is not. I think this error should be "invalid (empty) link text.
"
WebXM raises the error "Create link phrases that make sense when read out of context
" for the situation of an image link in which the alt-text is empty and also for the case when the alt-text is just spaces (test 23). The error description is directly from the WCAG, but these situations seem to me to be worse than the inability to read out of context. There is no link text! On the other hand, when there is no link text, JAWS reads the image source filename, which in this case is Resources
, giving good information about the link. One certainly should not count on that.
Bobby raises the error "Provide alternative text for all images
" for this file, and also the warning (not error, as in test 21) "Make sure that all link phrases make sense when read out of context.
" This warning is raised for all files that have links. In this case, the image has alt-text. Bobby's response is not adequate.
Image link with spaces for alt-text: Very similar to test 22, this file, step-13-1-1-f3.htm, has an anchor element (a) that contains just one img element and the alt-text on that is alt=" " (quote four-spaces quote).
Results: InFocus failed this test, and the other tools passed (WebKing got it right even though it failed test 22).
Link with empty alt-text but also text: This file, step-13-1-1-s2.htm, represents a common situation: there is an image in the anchor with alt="", but there is also text in the anchor. This file should pass, but a tool gets a score here only if it passes this file and fails the file in test 22. The issue here is distinguishing between empty link text and nonempty link text.
Results: Two tools failed this test: Bobby and InFocus. Bobby raised the same errors for this file as for the one with empty alt-text and no text in the anchor.
Link text; "click here
" with title attribute: This file (step-13-1-1-s3.htm) has an anchor element (a) containing the text click here, which is inadequate (see test 21). But there is also a title attribute on the anchor that specifies the target of the link. This is not an error. A tool scores here only if this file passes and test 21 fails.
Results: Two tools got this right: Ramp and WebKing. Watchfire informed me that WebXM has an option to look for the title attribute on links, but that is switched off in the default settings that I used.
Same link text, different targets: If two links have the same link text but different targets (href), then the links cannot be distinguished in a list of links. This file, step-13-1-2-f.htm, has two links with the same text but different href. It is an error.
Results: All of the tools passed this test.
Page title: The content of the title element of a page is what appears in the title bar of the browser, and it is spoken by a screen reader when the page opens. Every page should have a nonempty title element. This file, step-13-2-f.htm, has no title element, which is an error.
Results: InFocus and WebKing were the only tools that did not raise an error in this case. The other four tools passed this test.
Inadequate page title: This test is similar to test 27, but here the title is Title
—the code looks like this: <title>Title</title>. The file, step-13-2-f2.htm, should raise an error.
Results: Only Ramp got this right on the first testing pass. The newer version of WebKing joined the circle of winners after the second test run. Four tools failed this test.
Skip link: The two files both have links at the top of the page followed by text. The file that fails has neither headings nor a skip link after the "navigation links
" (step-15-2-f.htm). The file that is okay has a skip link (step-15-2-s2.htm). A tool scores on this test if it raises an appropriate error on the file with no skip link, step-15-2-f.htm, and does not raise that error on step-15-2-s2.htm, which has the skip link.
Results: Three tools got this right: InFocus, LIFT, and Ramp.
Heading for skipping to content: This is exactly like test 29, except that the successful file (step-15-2-s.htm) has headings, especially a level 1 heading at the beginning of the main content.
Results: I was disappointed that, on the first pass through the tests, none of the tools that were looking for skip techniques at all recognized headings as such a technique. Now Ramp Ascend 6.0 sees a heading after a block of links as a technique for skipping those links. This test can be turned on and off in the Accessibility Options of Ramp. I hope more tools will recognize this option, because headings markup provides a much better technique for addressing page navigation than skip links (see Chapter 7).
Layout table that won't resize: When a layout table uses pixel widths, it won't resize with either a larger window or larger text. This file, step-3-4-f.htm, uses fixed widths in pixels. The response by the tool needs to be compared with that for a file that uses percentage widths instead of pixel widths (step-3-4-s.htm). The tool is successful if it raises an error for the table with fixed widths and does not raise an error on the table with percentage widths.
Results: All of the tools got this right, although Ramp failed on the first pass through the tests.
Data tables: The issue I wanted to check was whether the tools checked for data tables—distinguishing them from layout tables. The data table (step-5-1-s.htm) is quite obviously such and marked up properly. A tool scores here if there is no data table error or warning on the good table or on the layout table (step-5-1-s3.htm) and there is a table markup warning or error on the one that does not use th (step-5-1-f.htm).
Results: Four tools got this right. Bobby and WebXM failed. Ramp raised an interactive check for the user to confirm that a table is a data table. But Ramp is successful because it is raising that test when it suspects a table is a data table, and not on all tables. So, it raised the interactive check on the data tables and not on the layout tables.
Layout table with a summary: It is an error for a layout table (step-5-1-f3.htm) to have a summary attribute and/or th markup.
Results: Only Bobby and Ramp got this right.
Bobby raised a warning, "If this table is used for layout only, do not use structural markup to achieve formatting effects,
" and it does not raise that warning when a layout table does not have structural markup. Ramp raised two errors: one for the summary attribute ("Tables used for layout should not have summary
") and one for the table head (th
) markup ("Tables used for layout should not use headings to create formatting effects
").
Frame source must be HTML: This file (step-6-2-f.htm) has a frame page (frameset) in which the first frame directly references an image (.gif). The src attributes of frame must be an HTML page.
Results: Only LIFT failed this test. The wording of the InFocus error in this case was awkward: "use markup file as source.
" But the tool definitely caught the problem.
Blink element: This file, step-7-2-f.htm, uses the blink element. This is an error because the result is blinking text and also because the blink element is deprecated.
Results: All of the tools passed this test.
Marquee element: This file, step-7-3-f.htm, uses the marquee element. As with test 35, this is an error because text is moving and because the marquee element is deprecated.
Results: All of the tools passed this test.
Auto-refresh: This page (step-7-4-f.htm) has an auto-refresh every six seconds, which is an error.
Results: All of the tools except InFocus and WebXM raised an error for the auto-refresh.
Keyboard access: The issue with this file, step-9-3-f.htm, is keyboard access. It contains a JavaScript function that requires a double-click (onDoubleclick), and it doesn't work from the keyboard. A tool scored here if it raised a scripting error on this file (no keyboard access) but not on step-9-3-s.htm, where onKeyDown is used for the same function.
Results: Only Bobby passed this test.
Structure of headings markup: WCAG suggests that headings should be used according to specification. There are two files for testing the use of headings. The correct one, step-3-5-s.htm, has the headings (in order) h1, h2, h2, h3, h1. The error file, step-3-5-f.htm, has h4, h1, h2, h5, h1. There are two errors here: the transition h4 (starting) to h1, and h2 followed by h5. The use of headings is crucial for page navigation, so errors like these are not important, in my opinion.
Results: LIFT and WebKing failed this test. Deque pointed out that Accessibility Evaluation and Repair Tools (AERT) techniques specify that the requirement on header nesting to be that "Header levels must not increase by more than 1 level.
" So there is only one error in the subject file, step-3-5-f.htm, which is the transition from h2 to h5, by this specification.
For pages with no headings markup whatsoever, LIFT warns, "Use header elements according to specification.
" Yet neither of the pages with headings markup (step3-5-s.htm and step3-5-f.htm) got that warning. It seems totally backwards to me.
Title for inline frame: This is another frame issue—an iframe without a title attribute (step-12-1-f3.htm).
Results: All the tools, except InFocus, got this right.
| Test | Correct | Bobby | InFocus | LIFT | Ramp | WebKing | WebXM |
|---|---|---|---|---|---|---|---|
1. alt-text |
6 | yes | yes | yes | yes | yes | yes |
2. ASCII art as alt-text |
2 | no | no | no | yes | yes | no |
| 3. Object requires default content | 6 | yes | yes | yes | yes | yes | yes |
| 4. Image button | 5 | yes | yes | yes | yes | yes | no |
5. Long alt-text |
6 | yes | yes | yes | yes | yes | yes |
| 6. Image map areas | 6 | yes | yes | yes | yes | yes | yes |
| 7. Server-side image maps | 6 | yes | yes | yes | yes | yes | yes |
| 8. Frame titles | 6 | yes | yes | yes | yes | yes | yes |
| 9. Quality of frame titles | 3 | no | yes | no | yes | yes | no |
10. Input element needs label |
6 | yes | yes | yes | yes | yes | yes |
11. Use of title attribute for form control |
3 | no | yes | no | yes | yes | no |
| 12. Text intervenes between label and control | 5 | yes | no | yes | yes | yes | yes |
| 13. Label text from two places | 6 | yes | yes | yes | yes | yes | yes |
| 14. Invisible GIF holds prompt | 6 | yes | yes | yes | yes | yes | yes |
15. Label matches no control |
6 | yes | yes | yes | yes | yes | yes |
16. Two controls with same id |
3 | no | no | yes | yes | yes | no |
17. Textarea needs label |
6 | yes | yes | yes | yes | yes | yes |
18. Select menu needs label |
6 | yes | yes | yes | yes | yes | yes |
19. Inaccessible select menu |
1 | no | no | no | no | yes | no |
20. Empty label |
3 | no | no | no | yes | yes | yes |
21. "Click here" |
4 | yes | no | no | yes | yes | yes |
22. Image link with empty alt-text |
4 | yes | no | yes | yes | no | yes |
23. Image link with spaces for alt-text |
5 | yes | no | yes | yes | yes | yes |
24. Link with text and image with empty alt-text |
3 | no | no | yes | yes | no | yes |
25. "Click here" plus title |
2 | no | no | no | yes | yes | no |
| 26. Same link text; different URLs | 6 | yes | yes | yes | yes | yes | yes |
| 27. Page title | 4 | yes | no | yes | yes | no | yes |
| 28. Adequate page title | 1 | no | no | no | yes | no | no |
| 29. Skip link | 3 | no | yes | yes | yes | no | no |
| 30. Headings for skipping | 1 | no | no | no | yes | no | no |
| 31. Layout table won’t resize | 6 | yes | yes | yes | yes | yes | yes |
| 32. Data table | 4 | no | yes | yes | yes | yes | no |
| 33. Layout table with summary | 2 | yes | no | no | yes | no | no |
| 34. Frame source must be HTML | 5 | yes | yes | no | yes | yes | yes |
35. Blink |
6 | yes | yes | yes | yes | yes | yes |
36. Marquee |
6 | yes | yes | yes | yes | yes | yes |
| 37. Auto-refresh | 4 | yes | no | yes | yes | yes | no |
| 38. Keyboard access | 1 | yes | no | no | no | no | no |
| 39. Headings structure | 4 | yes | yes | no | yes | no | yes |
| 40. Inline frame title | 5 | yes | no | yes | yes | yes | yes |
| Totals | — | 28 | 23 | 27 | 38 | 34 | 26 |
A large number of sophisticated software tools are designed to facilitate checking web content for accessibility. The basic products range in price from $50 to over $2,500, and enterprise-level products are also available. According to the lists of customers on the suppliers' websites, it is clear that federal agencies and corporations are buying into the idea of using these tools to test their sites for accessibility.
In this chapter, we barely scratched the surface of the accessibility testing tools. For looking at our test files, the six tools that we examined are remarkably similar. In a recent post to an e-mail list, Glenda Sims, Senior Systems Analyst at the University of Texas (UT) and member of the UT Web Team, had this to say about one of the tools we evaluated in this chapter:
WebXM is perfect for our decentralized needs. I work on a campus
with 1000+ webmasters. Yes, it is like trying to herd cats. WebXM gives us a
delicious dashboard that lets me quickly see the "health
" of our
entire site with a quick overview of which subsites within www.utexas.edu are the best and the worst.
We didn't even look at the dashboard. The point is that although the tools are similar in the task we undertook, they are radically different regarding other tasks and features, such as usability, security, integrity, scalability, reporting, and scheduling.
These tools are inherently limited in what they can do. Most aspects
of web accessibility require some human evaluation, and the best that can be
asked of the software tools is that they facilitate the human review process.
On the other hand, software accessibility checkers can do something human
evaluators cannot do: examine dozens (even millions, for some tools) of pages
to find missing alt attributes or label elements. Humans
are not so good at such exhaustive and tedious examination. Detectable errors
like these include some of the most important concerns for accessibility and
generally are symptomatic of more serious mistakes.
An important aspect of carrying out these tests was the way the tool developers reacted. All were supportive and responsive, and that was very reassuring. Of course, some were more responsive than others. Two stand out because not only were they helpful, but they also made significant changes in their products in response to this process. Parasoft (WebKing) and Deque (Ramp Ascend) made major improvements in their accessibility checking tools to end up in second and first place, respectively. Ramp went through two versions during this review process, and its current "winning" score of 38 out of 40 is for the newest version, Ramp Ascend 6.0.