Figure 12-1. The Accessibility section of the Adobe Reader Preferences dialog box.
Adobe Portable Document Format (PDF) is a popular format for publishing and delivering documents on the Web. Authors like to use PDF because PDF document creation is simple, the format preserves the appearance of the original document for printing and viewing, and it offers additional security on the document contents. Unfortunately, many authors deliver documents in PDF because of the ease of creating the file, and often the file is created without regard to accessibility. However, PDF documents can be highly accessible to users with various disabilities, sometimes with little additional effort on the part of the document author.
The single largest drawback to PDF is that authors need to focus additional attention on the document to ensure accessibility. Fortunately, Adobe Reader is getting better at analyzing and repairing PDF documents that lack accessibility information, but the need for the author to attend to accessibility remains important. The most important ingredients of an accessible PDF are a well-structured, well thought-out source document and the correct settings on the program used to create the PDF from the source document.
In this chapter, you will learn how users with disabilities can use PDF documents and how to create accessible PDF documents. The intent of this chapter is not to provide information about every possible method of authoring and viewing PDF files, but to focus on authoring and remediating PDF documents for accessibility. For most examples and discussion, I' ll be referring to Adobe Reader 7.0, Adobe Acrobat 7.0 Professional, and the Adobe Acrobat PDFMaker plug-in for Microsoft Word (and to a lesser extent, Acrobat 6.0 and Adobe InDesign CS2). Unfortunately, the accessibility story for PDF creation largely centers around Adobe' s own products. As of the time of writing, only two non-Adobe products (Open Office and the Microsoft Office 12 beta) are able to create PDF documents with tags.
Adobe Reader offers a significant amount of support for users with a variety of disabilities. Some features enable an author to provide more accessible content, but others require little or no effort from the author and are available for the user if needed.
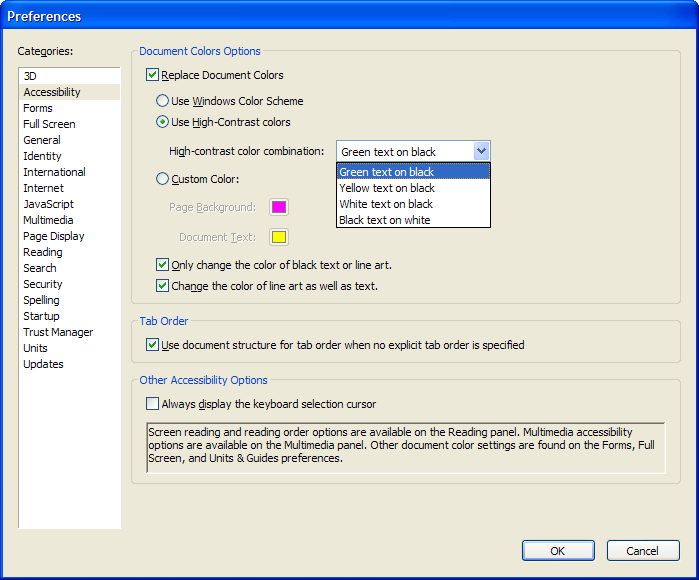
Many users benefit from the ability to adjust colors used to display documents. Adobe Reader provides a means to modify colors used within a PDF in the Accessibility section of the Preferences dialog box, as shown in Figure 12-1.
Figure 12-1. The Accessibility section of the Adobe Reader Preferences dialog box.
When you check the Replace Document Colors check box in the Document Colors Options group, you have three choices of how Adobe Reader should effect the change:
Adobe Reader will use the settings in the Windows Accessibility Control Panel. To modify the display setting, select the Display
tab in the Accessibility Options
dialog box and check Use High Contrast
. Several styles are available in the Settings for High Contrast
dialog box, as shown in Figure 12-2. This option is available only in the Windows version of Adobe Reader.
Figure 12-2. Windows Settings for High-Contrast dialog box.
Figure 12-3 shows a sample PDF document in normal contrast. Like the majority of documents on the Web, it has black text on a white background. With Windows high-contrast enabled, the document' s colors are modified to reflect the chosen high-contrast style of green text on a black background, as shown in Figure 12-4. Notice that the entire Adobe Reader application responds to this system-wide setting.
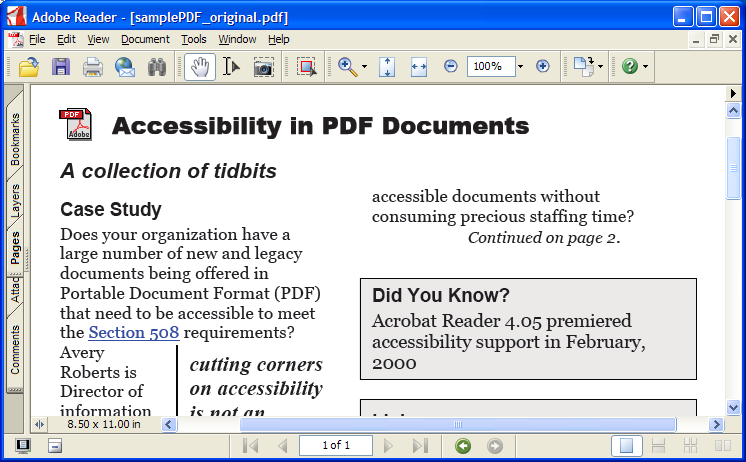
Figure 12-3. A sample document with normal contrast.
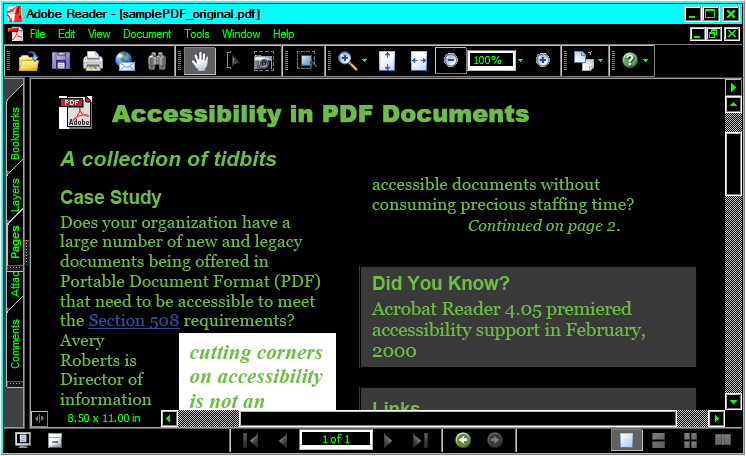
Figure 12-4. A sample document with Windows high-contrast enabled.
Upon inspecting the differences between Figures 12-3 and 12-4, you'
ll observe that the white box in the left column and the gray boxes in the right column don'
t change in color, although the text inside does. Text boxes don'
t change in Adobe Reader. In Microsoft Word, if the text box has the same background color as the page background, set the text box background to No Fill
in the text box'
s Borders and Shading
settings. This is discussed in more detail later in this chapter, in the "Color Contrast" section.
Another common issue is when a font color is applied to text in Word. Any text with a font color other than Automatic
will retain that color in the document color-replacement process.
The good news for PDF authors is that for most documents, you don'
t need to do anything for your documents to be accessible with high contrast. The most notable exception is when text is added on top of an image. In that case, the image will not respond to high-contrast settings, but the text will. One solution is to take advantage of the fact that explicitly colored text in Word doesn'
t change color and to apply a high-contrast color in Word (something that you would probably do anyway when placing text over an image). Another possible solution is to make the text part of the image and add the text to the image'
s Alternative Text
field, which we'
ll review later in this chapter, in the "Images" section. The main downside to this second solution comes into play when the document is resized, which we'
ll examine next.
Developing digital content for users who are blind tends to dominate discussions about accessibility, but this is due to the level of involvement required by the authors and is not proportional to the prevalence of blind users. In fact, users who can see but prefer to increase the size of the content are far more numerous. A 2003 Forrester Research report (The Market for Accessible Technology— The Wide Range of Abilities and Its Impact on Computer Use) found that 16 percent, or 27 million, working-age adults have mild visual difficulties or impairments; 11 percent, or 18.5 million, working-age adults have severe visual difficulties or impairments; and among computer users in the same group, about 25 percent have some form of visual difficulty or impairment. Given how ubiquitous PDF documents are, it seems safe to assume that somewhere between 16 and 27 percent of the working-age readers of your document would benefit from the ability to increase the size of the text.
Adobe Reader provides a very simple zooming feature. By using the keyboard shortcuts Ctrl++ (plus) and Ctrl+- (hyphen) to increase and decrease the level of zoom, selecting a zoom percentage from the Zoom
toolbar, or choosing Zoom To
from the View
menu, users can magnify a PDF until the text is a readable size.
Figure 12-5 shows the sample PDF document with the zoom level set to 200 percent. Since the whole document is being zoomed, even scanned text and images of text get larger, although these types of text will suffer pixelation issues at high zoom levels.
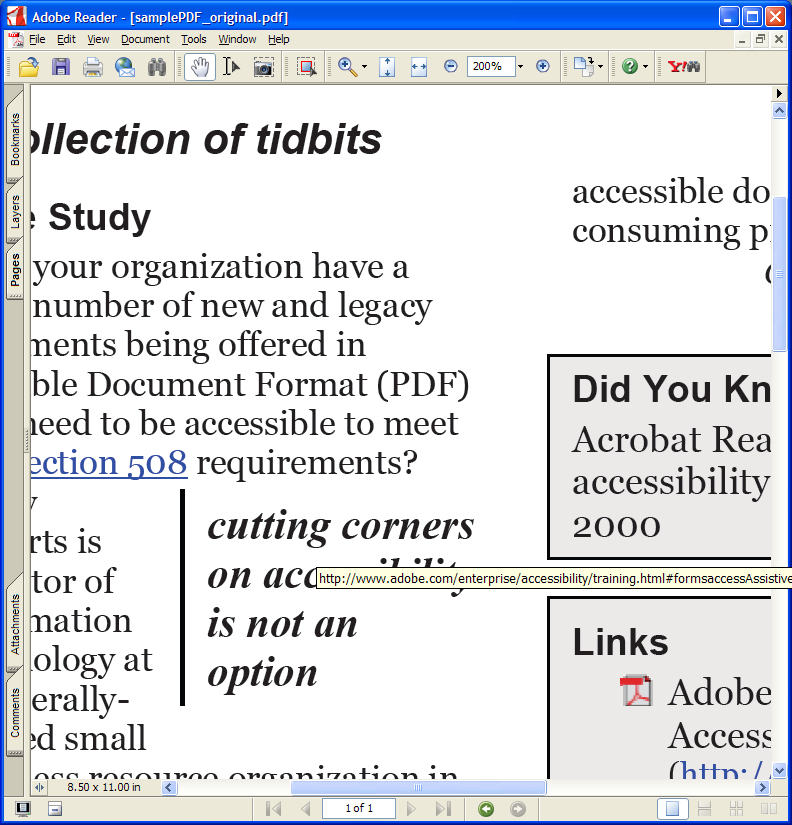
Figure 12-5. A sample document zoomed to 200 percent.
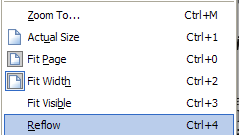
Zooming often renders a document substantially less readable because it introduces the need to scroll in two dimensions as lines of text stretch off the left and right page margins, as you can see in the zoomed example in Figure 12-5. Adobe Reader offers a feature called Reflow
, which the user can activate by selecting Reflow from the View
menu.
The Reflow feature prevents the need for horizontal scrolling by redrawing the page at the available width of the window, wrapping text and other content as needed. The best thing about the Reflow feature is that it requires no intervention from the author to enable it. Figure 12-6 shows the sample PDF zoomed to 200 percent with Reflow enabled.
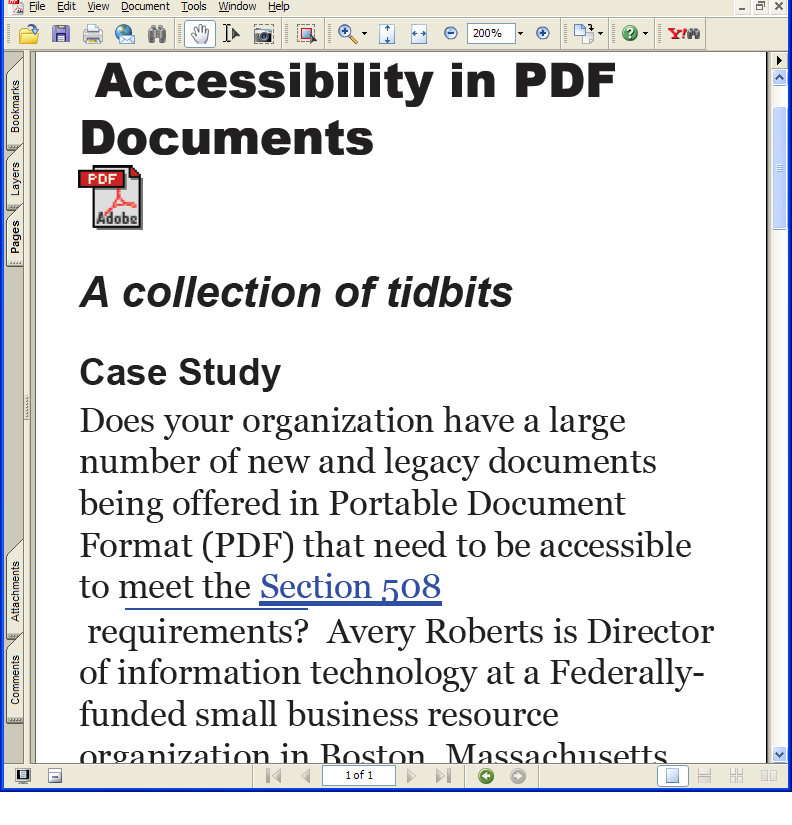
Figure 12-6. A sample document zoomed to 200 percent with Reflow enabled
In addition, the Reflow feature limits zooming for images and untagged content, so that zooming stops once the content reaches the edges of the window. One effect of this is that scanned documents, which are often a series of large images of the scanned pages, will generally not zoom much. Users can turn off the Reflow feature, but then they will need to scroll horizontally and vertically.
In the case of an image with text placed on top of it, the text resizing is limited by the size of the image. If the text is on an image that is as wide as the page, very little magnification will result. With Reflow turned off, the quality of the text in the image will degrade as the image pixelates.
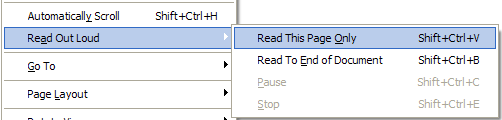
Adobe Reader has a Read Out Loud
feature that provides basic access to PDF documents. To activate this feature, the user selects Read Out Loud
from the View
menu.
Reading options can be set in the Reading
section of Preferences
dialog box, as shown in Figure 12-7.
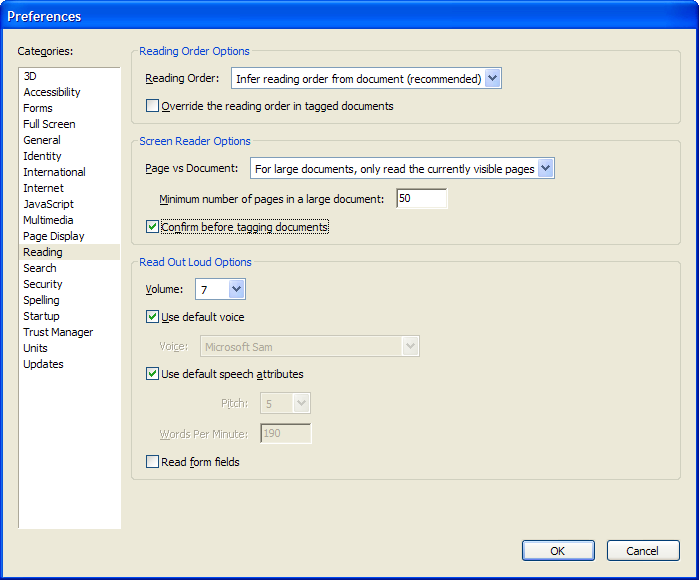
Figure 12-7. The Reading section of the Adobe Reader Preferences dialog box
A blind user is unlikely to find the Read Out Loud feature satisfactory for access to PDF documents. The Read Out Loud feature reads, but it doesn'
t communicate structure or links, nor does it allow the user to navigate through the document or the tables it contains. If you save a PDF as text (File > Save As Text
), the output created is the same as what is voiced in Read Out Loud.
Since not all users will download the PDF document to read in the full version of the Adobe Reader, it is important to note that it is not immediately apparent that the Read Out Loud feature is available for a document viewed in the browser. However, the Read Out Loud feature can be used by users who know the keyboard shortcuts to activate this feature. The shortcuts should be featured in the browser-based player user interface, but until that happens, the shortcuts are as follows:
Read This Page Only: Shift+Ctrl+V
Read To End of Document: Shift+Ctrl+ B
Pause Reading: Shift+Ctrl+C
Stop Reading: Shift+Ctrl+E
The Read Out Loud feature works best with previously tagged PDF documents. The reading order is usually based on the tag structure if it exists, so if the tags are in the correct order, the document will be read in the correct order. If the tags are jumbled, the user will probably find the document very confusing. If there are no tags in the document, the reading order is inferred by Adobe Reader. Tagging is discussed in detail in the "Tagged PDFs" and "Accessibility Repair and Optimization" sections of this chapter.
While the Read Out Loud feature follows a document' s tag structure, there is one notable exception. Since Read Out Loud always reads a page at a time, if tags are moved so that content is heard along with content on a different page, this change will not be heard by users listening to Read Out Loud. This is significant when a document contains a block of information that is separate from the main flow of the text and that spans pages. We' ll discuss modifications to the reading order for both screen readers and Read Out Loud in the "Verifying and Repairing Reading Order" section later in this chapter.
Adobe Reader is capable of including audio and video files. Adding captions and audio description (also referred to as video description) is more challenging. Truth be told, I' ve never successfully added media to a PDF that plays captions, except for a QuickTime movie with a caption text track that is part of the movie (rather than referenced via a QuickTime SMIL file).
Adobe Reader has a set of media accessibility preferences, available from the Multimedia
section of the Preferences
dialog box, as shown in Figure 12-8. These lead you to believe that the user can enable or disable captions, audio description, subtitles, dubbing, and language, but they don'
t actually do anything. These options align with SMIL 2.0 test attributes (systemCaptions, systemAudoDesc, systemOverdubOrSubtitle, and systemLanguage), but RealPlayer doesn'
t respond to these settings, nor does Windows Media. QuickTime and Flash have no player-level preferences related to captions, let alone audio descriptions, subtitles, or dubbing, so these media types don'
t stand a chance of responding to the preferences.
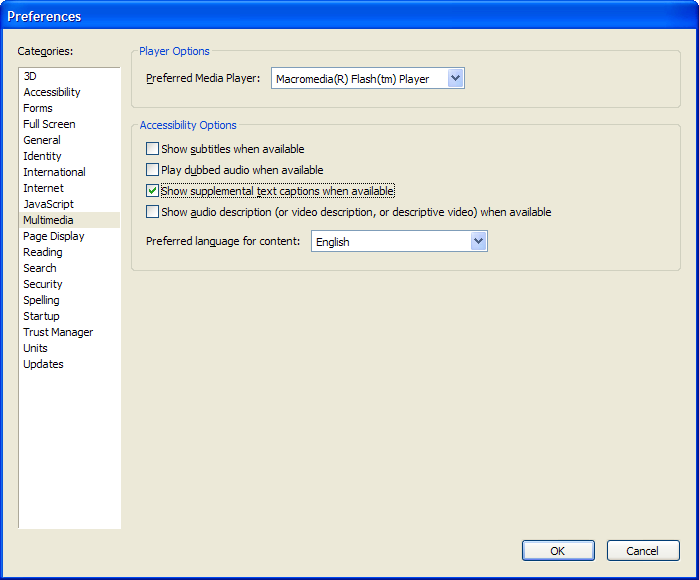
Figure 12-8. The Multimedia section of the Adobe Reader Preferences dialog box
To view examples of PDF files with captioning, visit the National Center for Accessible Media' s Beyond the Text project. At the project site, you' ll find a prototypes page with several examples of PDF documents containing captioned media created as part of an investigation into e-book accessibility.
If you are providing media that must be captioned or described, use QuickTime and add the caption track to the movie directly (this requires QuickTime Pro). If this is not possible, provide a separate link to the media so that it opens in the stand-alone media player.
Adobe Reader provides access to document information for assistive technologies, starting with the Accessibility plug-in available with Acrobat Reader 4.05 in February 2000. In the past few years, support for (and coordination with) assistive technologies has improved. Adobe Reader now supports a level of interaction with PDF documents using screen readers that compares favorably to the interaction experience with an HTML document.
Table 12-1 shows common elements and whether they are supported by popular screen readers or talking browsers. This list is not comprehensive, either in the types of elements that could be supported or the assistive technologies that are compared. It is simply intended to show that with three popular English-speaking tools for Windows users, Adobe Reader provides the necessary information to allow assistive technologies to deliver content to users.
| Element | JAWS | Window-Eyes | IBM HomePage Reader 3.04 |
|---|---|---|---|
| Text | Supported | Supported | Supported |
| Images | Supported | Supported | Supported |
| Links | Supported | Supported | Supported |
| Tables | Supported | Supported | Supported |
| Headings | Supported (JAWS 7.0) | Not Supported | Not Supported |
| Lists | Supported (JAWS 7.0) | Supported | Not Supported |
| Forms | Supported | Supported | Supported |
| Paged navigation | Supported | Supported | Supported |
Adobe also makes versions of Adobe Reader for Macintosh OSX and Unix that function with screen readers on those platforms:
Adobe Reader delivers information to a few platforms via Accessibility application program interfaces (APIs):
PDF documents must be tagged in order to correctly communicate information about document structure and functionality to the Accessibility APIs. Adobe Reader will add tags to any untagged document that it opens, with mixed results, as discussed in the next section. In order to deliver the most accessible PDF documents possible, some work is required on the part of a PDF author to modify the PDF tags.
Here are a few links for more information about PDF accessibility:
PDF tags are comparable to HTML elements. If you are familiar with HTML headings, anchors, tables, lists, paragraphs, forms, and headings, you'
ll catch on quickly. Other PDF tags exist, such as Article
and Annotation
, and authors can define new tags for their own purposes. However, for our purposes, we will stick to the predefined tags and focus on the tags that are supported by assistive technologies.
Tags do not affect the initial visual appearance of PDF documents, so you may not be immediately aware whether any specific PDF document is tagged. A quick check in the Document Properties
dialog box will make this apparent, as shown in Figure 12-9.
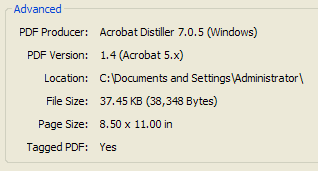
Figure 12-9. The Document Preferences dialog box indicates whether a PDF document is tagged.
Tags are needed for a few accessibility features in Adobe Reader:
Tagging a PDF document does come with a price. Adding tags to a PDF document may increase the file size by 50 percent or more. You can reduce the file size using the Reduce File Size
option on the Acrobat File
menu without any negative effect on the tags, but the file size will still be larger than the untagged version.
You can also resize documents using the PDF Optimizer tool available from the Advanced
menu (and also from the Tools
menu under Print Production
). When using the Optimizer tool, make sure that the Discard document structure
check box in the Discard Objects Settings
area of the Optimizer
dialog box is unchecked; if that option is checked, Adobe Acrobat will remove all tags upon optimization.
If a document is untagged, Adobe Reader will add tags to it unassisted, but this process is not perfect. Good tagging translates directly to a higher-quality experience for disabled users reading and interacting with PDF files. Leaving the tagging up to Adobe Reader will mean that images are lacking equivalents, structural headings are probably not indicated, and the reading order in multiple-column documents is most likely incorrect.
Tagged PDF documents can be created using a handful of tools, mostly Adobe products:
Many other tools create PDF documents. Notably, the Mac OSX operating system has a built-in, easy way to create PDF documents, but these documents are not tagged and will require some attention to be accessible. Mac owners can create tagged PDF documents using Adobe Acrobat or other tools in the preceding list.
Here, we' ll look at two common ways to create tagged PDF documents: using the Adobe Acrobat PDFMaker plug-in with Microsoft Word and using Adobe InDesign CS2.
In Microsoft Word 2000 and newer, Adobe Acrobat PDFMaker is installed along with Adobe Acrobat. This tool makes it easy to create tagged PDF documents.
To create a tagged PDF from a Word document, first select Adobe PDF > Change Conversion Settings
. In the Acrobat PDFMaker
dialog box, make sure that the Enable accessibility and reflow with Tagged PDF
check box is checked, as shown in Figure 12-10. If it is not checked, no tags will be added. This setting is persistent, so it doesn'
t need to be set every time.
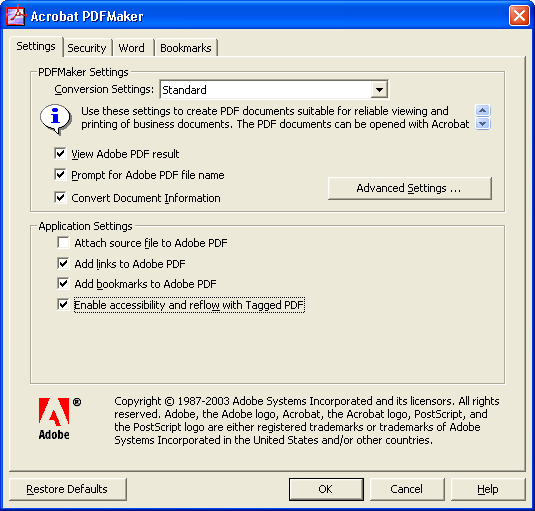
Figure 12-10. Make sure Enable accessibility and reflow with Tagged PDF
is selected in the Acrobat PDFMaker
dialog box.
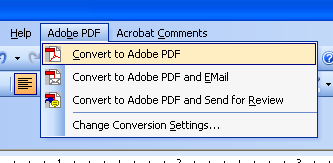
Next, choose Adobe PDF > Convert to Adobe PDF
. You will be prompted for the filename and save location for the tagged PDF.
You can create PDF documents by choosing File > Print
and choosing the Adobe PDF printer, but this will not result in tagged PDFs.
If you'
re enabling document security, you also need to make sure that this does not impact the PDF'
s accessibility. PDF documents can be locked in a variety of ways. Document authors can set a document password that prevents page modifications or even the ability to copy and paste content. In versions of PDF earlier than PDF 1.4 (Acrobat Reader 5.0), adding the security necessary to prevent copying and pasting of text and images also meant blocking access for screen readers. If you are adding security to your PDF files, make sure that you are using PDF 1.4 or newer. Also make sure that the Enable text access for screen reader devices for the visually impaired
option checked is checked in the Security
tab of the Acrobat PDFMaker
dialog box, as shown in Figure 12-11.
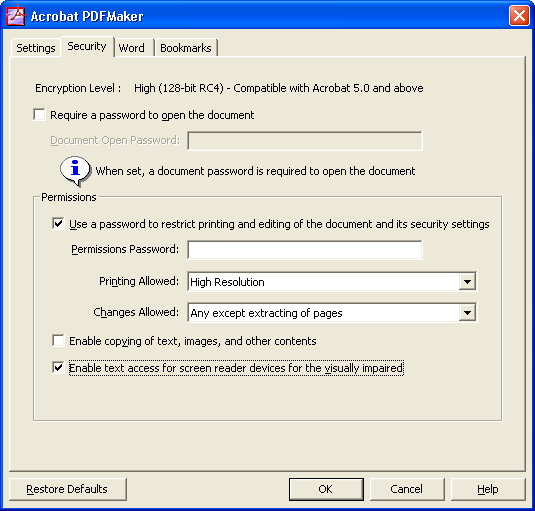
Figure 12-11. Make sure Enable text access for screen reader devices for the visually impaired
is selected in the Acrobat PDFMaker
dialog box.
There is a short list of important tips that will result in a more accessible PDF document and fewer issues to resolve in Adobe Acrobat after creating the PDF. Not surprisingly, the tips are similar to tasks that HTML developers need to pay attention to when creating accessible websites. The areas that need attention are Images, structure, tables, hyperlinks, lists, reading order, and color contrast. We'
ll review the sample Word document shown in Figure 12-12 (samplePDF.doc) as we go through the accessibility recommendations.
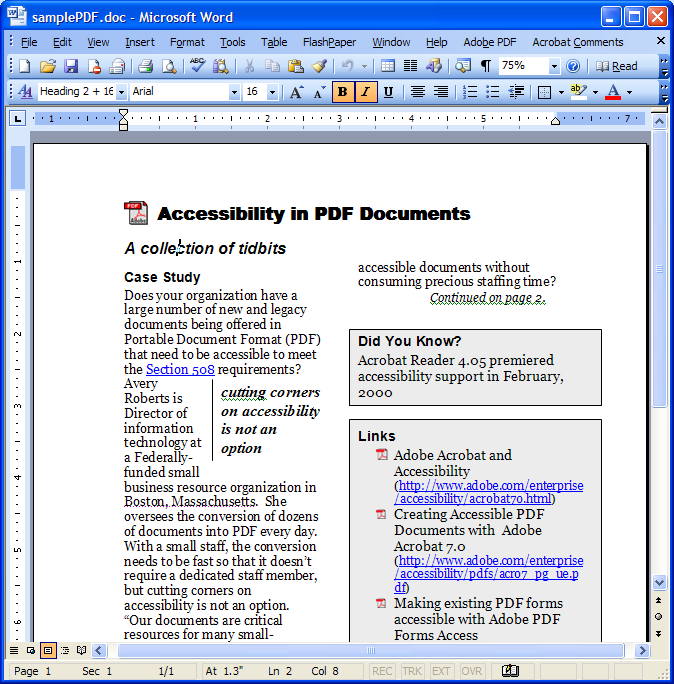
Figure 12-12. A sample PDF created in Microsoft Word
Graphics, photographs, and other images inserted into Word need to have text equivalents. You can easily add text equivalents using the Format Picture
dialog box, shown in Figure 12-13. To open this dialog box, either right-click an image and select Format Picture
or select an image and choose Format > Picture
. In the Format Picture
dialog box, choose the Web
tab, and enter the alternative text that represents the content of your image.
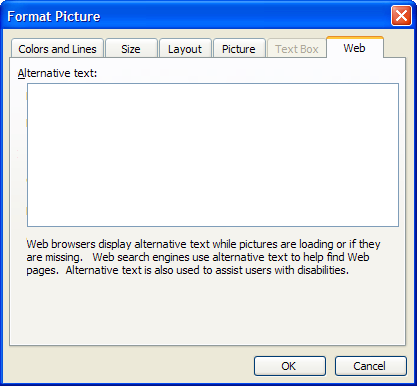
Figure 12-13. The Web
tab in Word'
s Format Picture dialog box provides a way to add text equivalents to images.
If you do not want a particular image to have a text equivalent, leave the Alternative text
box blank. This is the PDF equivalent of HTML'
s alt="" for null images. For example, in the sample document (samplePDF.doc), the image at the top of the page could have "Adobe PDF" as the text equivalent, but in this situation, the image doesn'
t really carry any information—
it just serves as a visual reinforcement for the adjacent text. So, it makes sense to leave its Alternative text
box blank.
If you have an image that is composed of several individual parts, make sure to use Word'
s Group
option, available from the Draw
menu on the Drawing
toolbar. That way, you will need to write only one text equivalent for the image.
Conveying structure in a PDF document is very important. In HTML, you add h1 through h6 headings to provide structure, and the process is similar for a PDF file. Word provides document styles to make document formatting easier. The key to easily adding structure to PDF documents that originate in Word is to use styles to structure your document with headings, as shown in Figure 12-14.
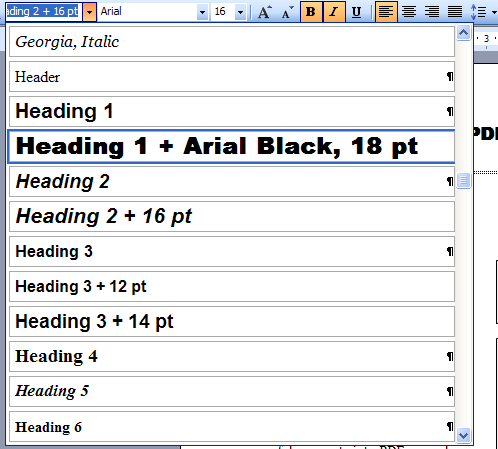
Figure 12-14. Use Word' s document styles to add headings to Word documents before converting documents to PDF.
When converted to PDF, Word headings are tagged as headings in the PDF document. The headings will be used by JAWS 7.0 when reading and navigating a PDF document. Additionally, the headings can be used as bookmarks in the PDF document to ease navigation for all users, not just those using JAWS.
In the sample document (samplePDF.doc), Word headings are used to create a basic heading structure, as shown in Figure 12-15.
Figure 12-15. The unmodified tag structure tree, including headings, as viewed in Acrobat after converting samplePDF.doc to a PDF
At the time of writing, only JAWS 7.0 can access headings in PDF documents, and only when Adobe Reader version 7.0 or newer is used. It seems likely that other screen readers will add this support in the future. However, many users would benefit from additional navigational abilities. One way to handle this when using Microsoft Word as the PDF source document is to add a table of contents at the beginning of the document, and include clickable reference links (using Word references, found on the Insert menu) that take the user directly to major sections of the document. This may be easier for some users than opening and navigating the Bookmarks panel in Adobe Reader.
Basic tables are simple to handle in Word. When creating a table in a Word document, always use Word'
s Table
feature rather than using tabs to align columns and drawing lines for cell boundaries. As in HTML, it is important to identify headings in tables. To do this, select the row containing headings, choose Table > Table Properties
, and check the Repeat as header row at the top of each page
in the Table Properties
dialog box, as shown in Figure 12-16.
Figure 12-16. Mark rows containing headings in the Table Properties
dialog box.
The result of marking table rows in this way is not entirely satisfying, but clearly distinguishes the headings. The rows marked as headings in Word are placed in a <THEAD> tag, but the cells are marked as <TD> tags, not <TH>. See Figures 12-17 and 12-18 for a comparison of the treatment of identified and unidentified row headings.
Figure 12-17. Table tag structure when table heading row is not identified
Figure 12-18. Table tag structure when table heading row is identified
For a simple table with headings only in rows, this is adequate to identify the headings. Tables that require headings for rows as well as columns will need to be modified in Adobe Acrobat, as explained in the "Verifying and Repairing Tables" section later in this chapter.
For tables with multiple levels of headings, such as the one shown in Figure 12-19, cells are merged in Word so that they span multiple columns or rows. When converted to PDF, these cells are correctly indicated in the PDF tag structure, although it is not immediately apparent. The tag structure for the table appears to be ambiguous with regard to which heading cell aligns with others, as shown in Figure 12-20, but drilling into the properties for the table cells in question reveals that attributes for rowspan and colspan are created. To check these attributes, view the properties for the table cell and click Edit Attribute Objects
to open the Attributes
dialog box, as shown in Figure 12-21.

Figure 12-19. A table with multiple levels of headings
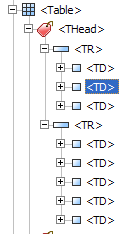
Figure 12-20. Table tag structure for a table with multiple level headings
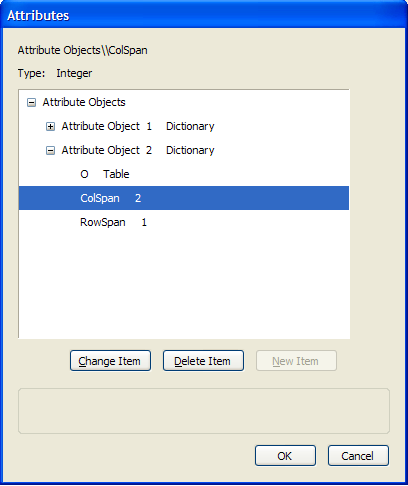
Figure 12-21. Examine the attributes for a table tag to verify that colspan attributes are used.
It merits mention that support for complex tables is not a strong suit of screen readers. If you have multiple levels of headings on both columns and rows, users will not have particularly positive experiences accessing the information, even though it may be technically accessible. Screen readers are improving in this area, but you should make sure to test your complex tables with assistive technologies.
Word hyperlinks are converted accurately by Acrobat PDFMaker. The issue is in ensuring that the link text makes sense out of context, which is largely editorial. Make sure that your links are short and to the point. If your link text is a URI, try to make it appear on a single line, because Adobe Reader will break the link into separate parts for each line. This is fixed if the document is reflowed, but presents some difficulties when the document is not reflowed.
Ordered and unordered lists can be identified as lists by assistive technologies as long as they are tagged as lists. Acrobat PDFMaker will tag lists that are created using Word' s bullets and numbering feature. This is not generally a problem (often it is more difficult to not make a list in Word). In general, if Word thinks that you made a list, so will PDFMaker.
In most cases, there is little ambiguity about the order in which text in a document should be read. The main exceptions are when authors add text boxes to a document and when columns are used.
Columns can be constructed several ways in Word. The best way to make accessible PDFs with columns is using Word'
s column-formatting feature (Format > Columns
). PDFMaker creates the tags in the correct order consistently when this feature is used, but is unable to do so reliably when columns are created using text boxes or by setting a tab stop in the middle of the page.
Text boxes in Word are used for more than columns, as in samplePDF.doc. In this file, the callout text "cutting corners on accessibility is not an option
" is in a text box. As you will see when we discuss repairing PDF files, this text is not in the best logical location in the tag structure and needs to be adjusted.
Headers and footers in Word are not part of the reading order when exported using the PDFMaker utility. If you need to include this information, you must add it manually in Acrobat or include it as part of the document body, rather than in the header or footer region. In many cases, the document footer indicates the page number, which is functionality that Acrobat Reader provides for the user.
PDF authors should make sure that adequate contrast is provided in the content. Adobe Reader handles most color contrast issues for you, but text boxes present a problem. The problem is that Adobe Reader is capable of changing text and background colors in a PDF document, but the background color of text boxes is not changed even though the text is changed.
Text boxes often have a background color, and even if the color is white to match the usual page background, this color is often explicitly specified in Word, as shown in Figure 12-22. The result can be black text on a white text box turning into white text on a white text box. For text boxes that have the same background color as the page, you can set the text box background to No Fill
, so that changes to the page color will show through the text box.
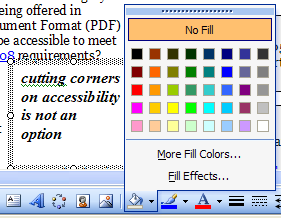
Figure 12-22. Background color selection pallete. Be careful when using a text box with a background color. Use No Fill
whenever possible.
Adobe InDesign CS2 allows document authors to add tags to their documents, but the process for creating a structured and tagged PDF is not completely obvious.
InDesign provides two ways to create tagged PDF documents:
File Exportdialog box on an individual basis.
To verify that tagging is enabled for all documents in InDesign, select File > Adobe PDF Presets > Define
. Click each preset to determine if tags are enabled (this feature is enabled in the High Quality Print preset by default). Click New to define a new preset. In the New PDF Export Preset
dialog box, make sure that the Create Tagged PDF
check box is checked, as shown in Figure 12-23.
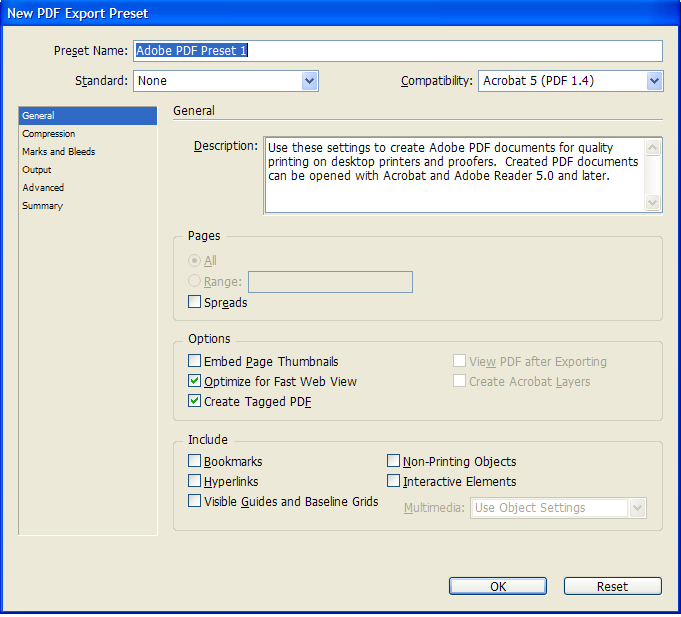
Figure 12-23. Make sure that Create Tagged PDF
is checked when creating a new PDF export preset in InDesign.
InDesign does create tags for PDF documents, but to get the tags to be recognized as semantic structures such as headings by screen readers, you need to use styles that are named appropriately. The style names are used in creating the tag structure, so a style named h1 will result in JAWS identifying the contents as a level one heading, but other names will not have the same effect.
InDesign provides a Structure panel (select View > Structure > Show Structure
), which is similar to the Tags
tab in Acrobat (discussed in the next section). You can move tags around in the overall structure, and the resulting PDF document will reflect these changes. It is possible to tag an element in the Structure
panel as one of a selected few tags (H1 through H6, P, Artifact, and so on), but it is important to note that these changes appear only in InDesign'
s XML output, not the PDF. It is possible to tag a text block as an H1 heading, but this change does not affect the exported PDF.
You can add text equivalents to images in InDesign by right-clicking the image'
s tag in the Structure
panel and choosing New Attribute
. In the New Attribute
dialog box, enter Alt in the Name
field (it'
s case-sensitive, so make sure to capitalize the A in Alt) and the text equivalent in the Value
field.
In most cases, you will need to edit accessibility tags in Acrobat Professional after publishing a PDF document from InDesign in order to include other semantic elements such as links and lists, and to identify changes in the primary language of the PDF document text. This type of repair is the subject of the next section.
Automated tagging—whether in Acrobat PDFMaker, Acrobat Professional, or Adobe Reader—is imprecise, and errors and misinterpretations are inevitable. Documents with incorrect tags need to be repaired in Acrobat. Repair in Acrobat can be a time-consuming task when the document is very long or untagged.
Older Adobe Acrobat versions support tag repair, but Acrobat 7.0 Professional makes the repair process ten times easier (in my estimate). Acrobat 7.0' s TouchUp Reading Order tool alone makes the upgrade worthwhile.
The first step in repairing PDF files for accessibility is to verify whether they are already tagged. Once Acrobat takes its best shot at tagging, the repair process begins. Here, we' ll look at how to deal with untagged documents, and then how to repair tags.
PDF documents must be tagged in order to be accessible. As mentioned earlier in this chapter, Adobe Reader will add tags to untagged documents automatically, but this process is imperfect. Let'
s look at an example. The samplePDF.doc file (shown earlier in Figure 12-12) was converted to PDF by PDFMaker, but with the tagging disabled, so it is not tagged PDF. When you open this document in Adobe Reader 7.0, a dialog box indicates that the document is to be tagged, as shown in Figure 12-24.
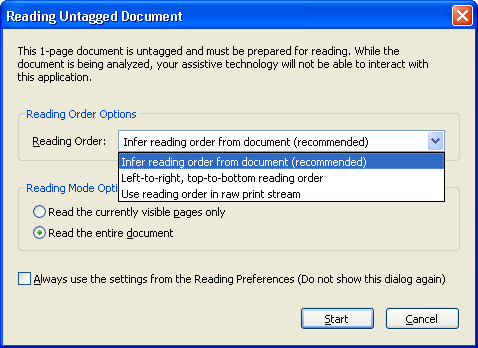
Figure 12-24. The Reading Untagged Document dialog box indicates that a PDF lacks tags.
Once the tagging is done by Adobe Reader, you read the document in JAWS 7.0, with the following results:
If ideally tagged, this same PDF would be read by the screen reader with the following results:
samplePDF.pdf document, I believe it is.)Adobe Reader did a decent job of defining tags resulting in a readable document, but several important features of the document were omitted. Depending on the complexity of your documents and the version of Adobe Reader that you are using, the accuracy of the PDF tags created will vary.
In Acrobat 7.0 Professional, you use the Tags tab to work with tabs. To display this tab, select View > Navigation Tabs > Tags
. The Tags tab will appear as either a floating tab or a docked tab, as shown in Figure 12-25.
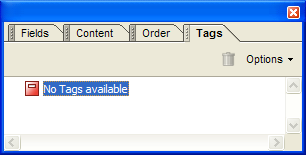
Figure 12-25. The Tags tab may appear as a floating tab or a docked tab.
If the Tags
tab is floating, you can add it alongside the docked tabs by clicking and dragging the tab title to the Navigation
pane. This is highly recommended as it keeps the document and the Tags
tab out of each other'
s way and makes the Tags tab as tall as the document. You'
ll want the space.
The Options
menu in the Tags
tab has options and context-sensitive items similar to those found on the Advanced
menu, under Accessibility
.
Untagged PDF documents, however they are created, are easy to add tags to in Adobe Acrobat. Simply open the untagged PDF in Adobe Acrobat. In the Tags
tab, you'
ll see that the document is untagged.
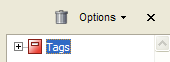
Select Advanced > Accessibility > Add Tags to Document
. After a few seconds (depending on the document length), the Tags
tab indicates that the tags have been created by showing a fully collapsed tree control that is named Tags
.
Let' s take a look at what happened. If you expand all tree nodes (click the tree and press the asterisk key), you' ll find the following tags:
If the same Word document is saved as a PDF on an OSX system and then brought to a Windows machine for tag repair (a legitimate scenario: PDF documents created on a Mac and made accessible on a Windows machine), the results are similar, but different. When Adobe Acrobat tags the PDF that originated on the Mac, it finds one less heading and no links. It does find and tag the table correctly (but still no table headings), and it has the same difficulty with the callout box text.
Your document is now tagged PDF. You' re a step closer to a really accessible PDF document. Don' t forget to save the document!
In general, adding tags is easy to do, but the results will vary. We' ll leave it up to Adobe to continually improve the automatic tagging process, but until tagging happens accurately and retains intended semantic information, you need to spend some time repairing the tags.
A common method for creating PDF files is to scan paper documents. This is often cited as a concern for PDF documents, particularly when a significant court case is underway, since U.S. courts create a lot of PDF documents by scanning.
Scanning turns the whole PDF into an image. The way to make the image accessible is to perform Optical Character Recognition (OCR) in Adobe Acrobat. To do this, with the scanned PDF open, select Document > Recognize Text Using OCR
and choose Start
. The Recognize Text
dialog box opens and provides information about how the OCR process will proceed, as shown in Figure 12-26.
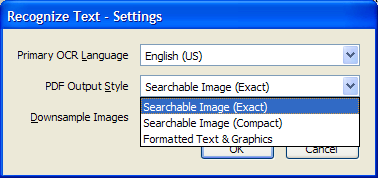
Figure 12-26. Choosing the PDF Output Style setting
Of particular interest is the PDF Output Style
setting. This setting determines whether OCR-recognized text replaces scanned text or sits behind it. You can change this setting by clicking the Edit button and choosing the style. As shown in Figure 12-26, you can choose one of the following output styles:
Formatted Text & Graphicssetting. This will replace the image of the document with text. Remember that OCR is not 100 percent accurate, so if there are many words or characters that can' t be determined by OCR, the document may end up with a mix of fonts, or it will take significant extra work on the PDF author' s part to repair.
The scanned document now has text in one form or another. The next step is to add tags as described in the previous section, and then begin the repair process, as discussed in the next section. You should expect that the repair process will take longer for scanned documents—just how long depends on the quality of the scan and how easy it is for OCR to find the text.
In order to address issues in a systematic manner, we' ll use the following list as a guide to making a PDF document accessible:
The list can also be used to help prioritize PDF repair. If you have only five minutes to repair a document, there is no question that reading order is the first order of business. Reading order affects many different users due to accurate tagging'
s impact on the Read Out Loud
feature, reflow appearance, and screen reader interoperability, and the potential for complete jumbling all or part of a document. Therefore, it must be at least verified. Headings and images are next, because they are easy to repair and have a significant impact on users. Links and tables are important, but these take a little more time to repair and are less common errors, so they go toward the end of the list, even though they are by no means unimportant.
As you become familiar with making PDF documents accessible, you will likely work through the document from start to finish, addressing different kinds of issues in parallel.
Repairing the reading order is absolutely critical. As you saw earlier in this chapter, Adobe Reader doesn' t always get the reading order correct on its own. Whether two whole columns are mixed together or a single callout quote is intertwined with the paragraph text, the outcome is content that is somewhere between difficult to understand and incomprehensible.
As a first step, you should verify the reading order, correct content that is out of order, and remove items that are not needed. You can use two main methods to modify the reading order: the TouchUp Reading Order
tool and the Order
tab. As noted earlier (in the "Dealing with Untagged Documents" section), you'
ll always use the Tags
tab to work with tags in Adobe Acrobat.
To verify the reading order, set up your Adobe Acrobat window so that you can see the Tags
tab as well as the page being edited, as shown in Figure 12-27 (from the samplePDF.pdf document). At this time, you may find that the ability to view the entire page is as important, if not more important, than the ability to easily read the content. When I'
m repairing PDF document order, I like to be able to see at least a whole page at a time, and sometimes wish for more since it is not uncommon for tags to be created on page 3 of a document when they belong on page 1.
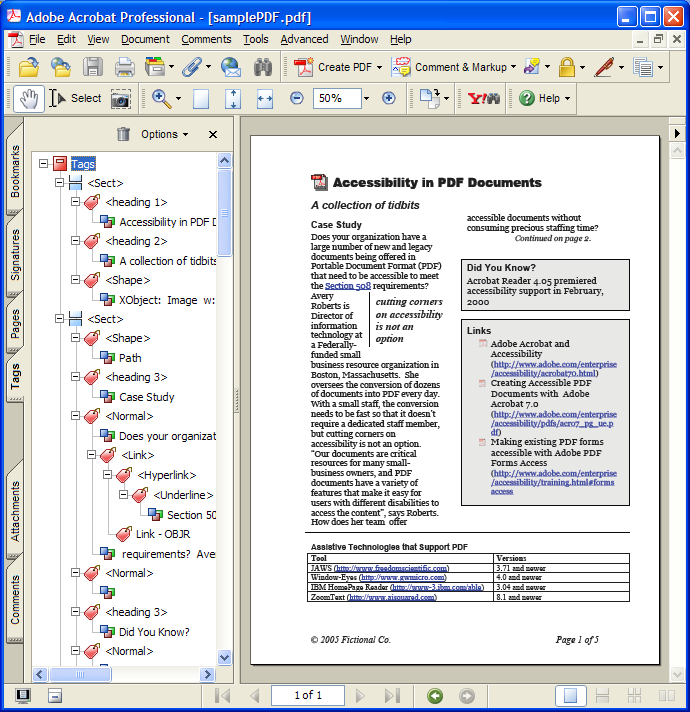
Figure 12-27. The Acrobat window, set up for examining reading order with a whole page in view at once
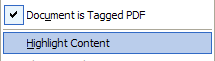
Next, enable the Highlight Content
option in the Tags
tab'
s Options
menu. Enabling this option means that clicking any part of the Tags
tree will highlight the tag'
s position in the document.
Now start at the top of the tree (I sometimes expand the whole tree by pressing the asterisk key) and move down through the tree items, watching the position of the highlighting as you do so.
Figure 12-28 show three examples of the movement of the highlight as I move down through the Tags
tree. Notice that the highlight doesn'
t follow the expected reading order.
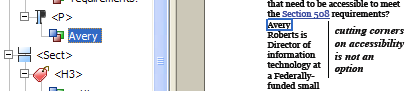
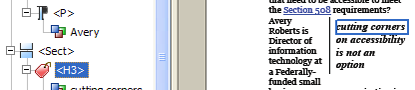
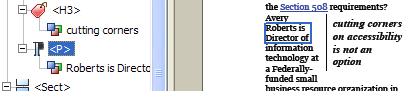
Figure 12-28. Checking the reading order of the tags
If everything is in the order you expect, great. If not, you need to move the tags around.
Moving tags around is simple. You can either click a tag or the tag content and drag it to a new location in the tree, or you can select the node with the keyboard and cut and paste. When you move a node, all subnodes move with it. One way to handle this issue is to use the TouchUp Reading Order
tool. This tool will save you hours of work.
To access this tool, select Accessibility > Advanced > TouchUp Reading Order
. As shown in Figure 12-29, the TouchUp Reading Order
tool allows you to select sections of the document and click a button to change their tags.
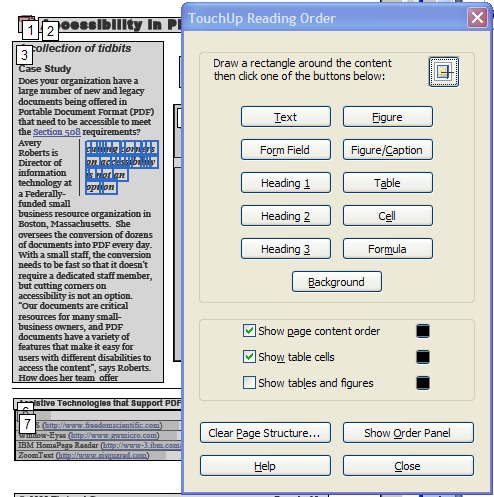
Figure 12-29. The TouchUp Reading Order
tool with a selected block of text.
After selecting a block of text (Figure 12-29 shows the callout text being selected), click the type of tag that the content should be enclosed within. In this case, Text
was chosen, and the callout text was placed within a single paragraph tag, as shown in Figure 12-30. Now the text can easily be moved or deleted.
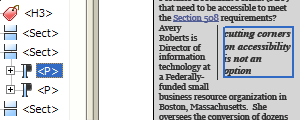
Figure 12-30. The TouchUp Reading Order
tool creates a new paragraph for the callout text (highlighted).
Move the text within the paragraphs and other tags, so that the text that goes together resides in the same tag, as shown in Figure 12-31. Then the extra, now empty, tags can be deleted.

Figure 12-31. The text that goes together resides in the same tag.
Since, in this case, the callout text is redundant to the story and mainly serves to break up the page visually, you might decide to delete it. All you need to do is locate the tags containing only the callout content and hit the Delete key for each. This clearly is not the solution for every situation, particularly not when two columns of text need to be separated.
The following are a few caveats regarding using the TouchUp Reading Order
tool:
TouchUp Reading Ordertool, the links are removed.
Show tables and figuresoption of the tool is very useful, but tends to get in the way, particularly on a crowded page. You should get comfortable with what information it provides and enable it only when needed.
TouchUp Reading Ordertool to modify tags results in a changed order of the paragraphs.
The Order
tab offers another method that you can use to reorder the content. To open it, select View > Navigation Tabs > Order
. You'
ll see the Order
tab, as shown in Figure 12-32.
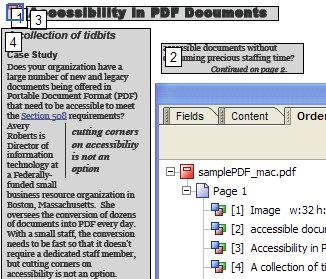
Figure 12-32. The Order
tab allows you to drag-and-drop blocks of text to change the order.
In the Order
tab, click and drag (or cut and paste) content blocks to move them to their new locations. Highlighting on the page helps make this process intuitive.
When you'
re using the Order
tab to modify the reading order, blocks of text will automatically combine. Sometimes, this is a good feature because it reduces the overall number of items you need to put in order or check. However, it can be viewed as a loss of control over the individual blocks on the page.
Another important point to realize is that the order of the content blocks in the TouchUp Reading Order
tool and in the Order
tab is not necessarily the same as what exists in the Tags
tab. Moving a block in the Order
tab does also change the tag structure, but changing the tag structure does not change the order of the content blocks in the Order
tab or the TouchUp Reading Order
tool view. Recognizing this difference makes the repair process much more understandable if you use both methods for reorganizing the reading order.
Some authors like to start accessibility repair with the Order
panel; others prefer to make exclusive use of the Tags
panel to make changes. Ultimately it is up to you to decide which method you prefer for your workflow.
The most common reason for adding text to a PDF is to provide a text equivalent for an image. For example, if the text in a scanned image can' t be recognized, you may need to add tags manually.
To add a tag manually, follow these steps:
Tagstree, select the node that you want to precede the new node.
New Tagfrom the
Tagstab' s
Optionsmenu to open the
New Tagdialog box.
Titlefield is not used in any output; it is used only to provide information in the
Tagstree view.
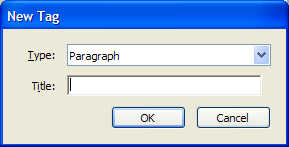
Figure 12-33. The New Tag dialog box
Propertiesfrom the
Tagstab' s
Optionsmenu and enter the text for the new tag in the
Alternative Textfield.
Adding alternative text is legal for all tags, but it will cause all content inside a tag to be hidden in favor of this value. In this case, this is the desired behavior. If there are any inline tags that need to be included in the text (for example, a hyperlink), the text will need to be split among multiple new tags to allow for the link without creating redundant text. You can' t add a link within alternative text.
The big downside to including text in a PDF in this way is that it won' t zoom with actual text. This is a drawback, but this technique is still preferable to not having the text available at all.
Headings are easily viewed by scanning through the Tags
tree. Whether you identify a heading that shouldn'
t be one or want to make text or images into headings, the process is basically the same. Choose from one of the following methods:
Headingbutton in the
TouchUp Reading Ordertool. If you want an
H4 heading, choose a different level in the tool (only levels 1 through 3 are available) and then redefine the tag.Tagstree and choose
Propertiesfrom the context menu or the
Tagstab' s
Optionsmenu. In the
TouchUp Propertiesdialog box, choose the tag you want from the
Typedrop-down list. This method will not disrupt the structures within a particular tag, so if you need to turn an existing heading that contains a hyperlink into a paragraph, this method is easiest since it leaves the link intact.
It' ll be a fine day when images get tagged with the alternative text automatically, but don' t hold your breath waiting for it. Tagging images is simple to do using either of the following two methods:
Tagstree and open the
Propertiesmenu option from the
Tagstab' s
Optionsmenu. Add the text equivalent in the
Alternative Textfield. If you don' t want the image to be heard at all, you can delete the tag containing the image from the
Tagstree.
Edit Alternative Textoption, open the
TouchUp Reading Ordertool and try again. You' ll see the
Alternate Textdialog box, as shown in Figure 12-34. Specify the alternative text here.
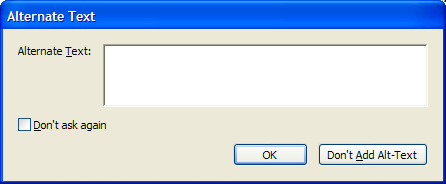
Figure 12-34. The Alternate Text
dialog box for providing text equivalents for images
Repairing tables is probably the most time-consuming PDF repair activity. The basic goal is for the Tags
tree structure for the table to look similar to the structure of an HTML table. Within a table tag, you need table rows; within rows, you need table header cells and table data cells; within table header and table data cells, you need content.
The TouchUp Reading Order
tool is a tremendous help because you can select whole tables or table cells and create tags. If the table is simple enough, you may be able to select the whole table with the TouchUp Reading Order
tool and click the Table
button. If you are fortunate, the table, table row, and cells will be created. However, there will be times when it is necessary to select individual cells and click the Cell
button. In this case, you may be able to move the newly created TD tags into an existing table tag. If not, you will need to create a table and table rows in the Tags
tree to have places to move the new cells.
To create a new element in the Tags
tree, select the tag that you would like to precede the new tag and choose New tag
from the Tags
tab'
s Options
menu. You can then drag tags and content into this new container. Don'
t forget to redefine the TD cells that should be TH tags as such.
Repairing complex tables is more difficult, as discussed earlier in the chapter, in the "Tables" section. Many complex tables can be correctly identified when rowspan and colspan attributes are used, as shown in Figure 12-21 earlier in the chapter.
If you'
ve already gone through the process of repairing the document as detailed in the preceding section, the results of Adobe Acrobat'
s accessibility checker (accessed from the Advanced > Accessibility
submenu) shouldn'
t be too much of a surprise. Acrobat'
s testing tool is useful as a verification that no images have been missed, the table structure is correct, form controls are in the document tag tree, and a few other criteria have been met.
The accessibility checker, like accessibility checking tools for websites such as Bobby and Lift, is unable to determine anything about the accuracy of the structure for the document or the quality of the alternative text. The accessibility checker does not produce a positive verification of accessibility; it checks for only the presence or absence of certain types of errors. As with other testing tools, there is the risk that people will assume that it checks everything. If you are relying on this tool to identify issues rather than examining the document manually, your document will not be as accessible as it could be, and it might not be accessible enough.
Adobe Acrobat is capable of adding basic form controls to PDF documents. In addition, Adobe LiveCycle Designer, an application that comes with Acrobat 7.0 Professional, allows for the creation of more sophisticated forms that are delivered as XML and rendered and processed by Adobe Reader.
Acrobat is able to insert text fields, radio buttons, check boxes, combo boxes, list boxes, and buttons, and all of these elements can be made accessible to assistive technologies. To insert form controls, open the Advanced Editing
toolbar from the Tools
menu. From this toolbar (or within the Advanced Editing
menu under Tools
), choose the type of form control, and then draw a rectangle on the PDF document where the field should reside. Immediately, a Properties
dialog box opens for the specific control type, as shown in Figure 12-35.
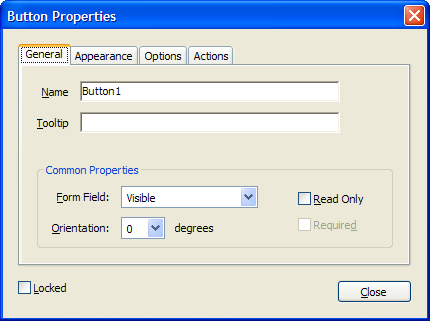
Figure 12-35. Add information for assistive technologies in the form control'
s Properties
dialog box.
In this dialog box, make sure that you add a tooltip for each control. This text will be used by assistive technologies to describe the control.
After you'
ve added form controls, you need to tag the PDF document. If it is already tagged, the form controls need to be introduced into the Tags
tree using the TouchUp Reading Order
tool. To do this, select the control and click the Form Control
button. Once this step is done, the form control tags need to be moved within the Tags
tree to the appropriate location to ensure a correct reading order.
Making form controls accessible is straightforward and relatively simple, and PDF forms, properly designed, can be used by users with disabilities. One major limitation of PDF interactive forms is that reflowing the document is not possible, which can cause some difficulty for low-vision users.
The PDF format has come a long way in the past five years, from prompting legal threats to its current position as a format for which many accessibility issues have been resolved. Even though there are accessibility solutions in place for many PDF features, it is apparent that Adobe continues to pay attention to accessibility issues within PDF documents. Additional awareness and resources for developers of PDF documents are always needed to improve the average level of accessibility within PDF documents on the Internet, but today PDF documents are more accessible than ever. Creating PDF documents that meet accessibility requirements is not just possible, it' s getting easier all the time.